Administrators on your account have full access to all of your Intulse phone numbers. You have the option of purchasing new phone numbers through Intulse or porting your existing numbers from your previous provider to your Intulse account.
In addition to managing your phone numbers and port orders, this portion of the Account Center also allows you to enable messaging, set up and update your E911 address and caller ID names, manage your failover route information, and register any brands/campaigns.
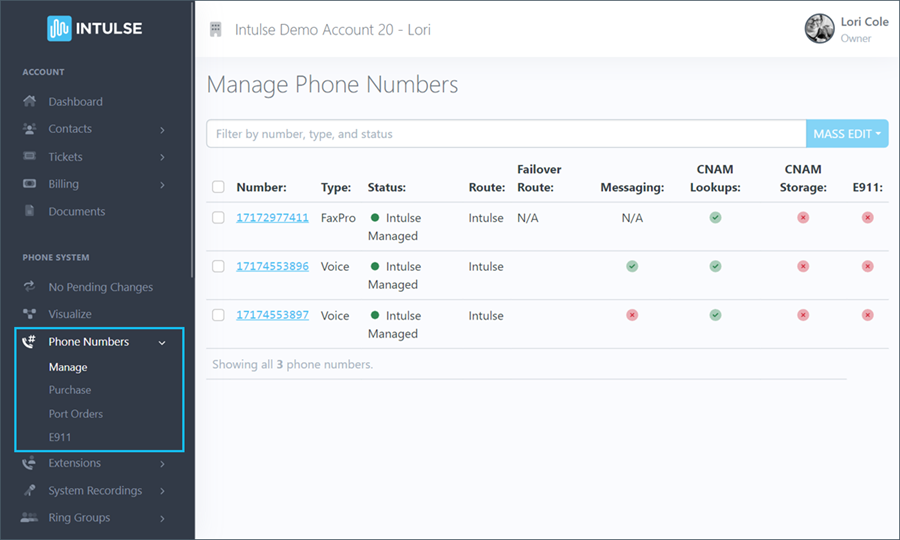
To manage your phone numbers, log into the Account Center and select Phone Numbers in the Phone System menu. You will see several different subheadings related to the phone numbers for your account. Select Manage from that list.
The Manage Phone Numbers screen shows all phone numbers on your Intulse account.

On this screen you can see the following details:
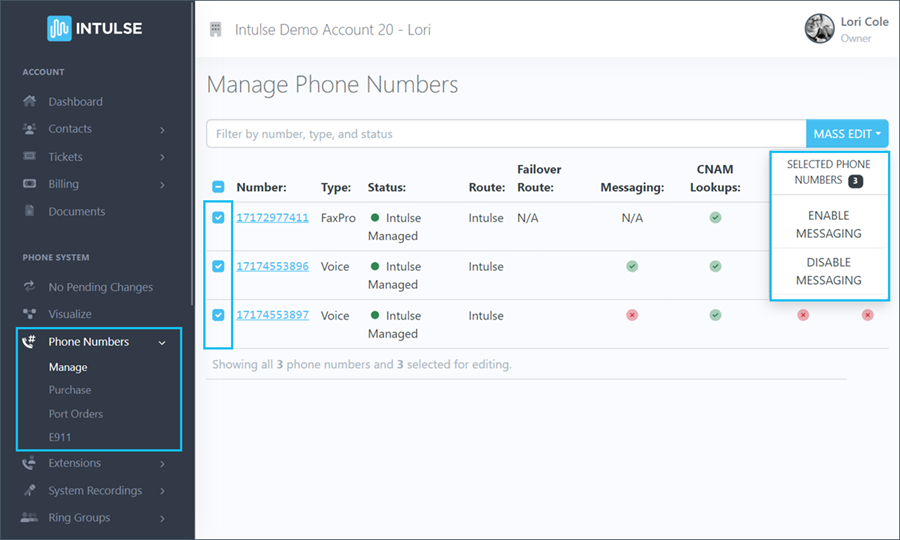
Text messaging can now be enabled or disabled for multiple phone numbers at one time. Select the checkbox beside the numbers to be edited and then select the appropriate option under "Mass Edit". The action notification will inform you of the status of each number.

Once messaging is enabled, you will need to go to the Intulse App Visibility page in the Account Center to make them visible for texting. More information on how to do that can be found here.
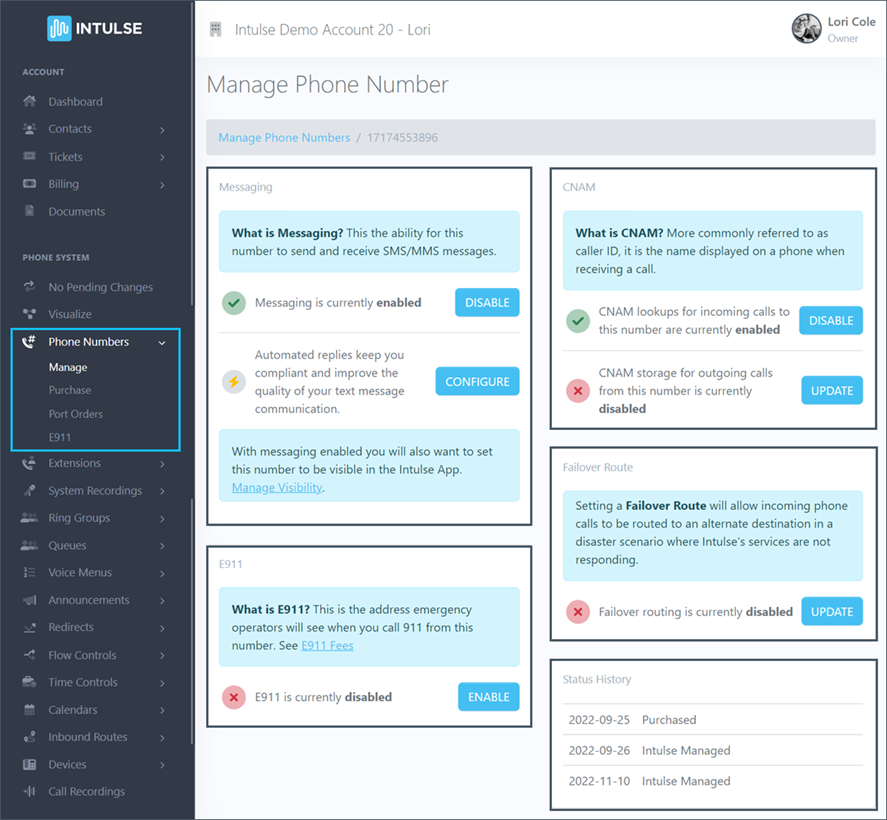
Select a phone number to update the settings for that number.

The Messaging portion of the screen allows you to enable/disable messaging, update your auto replies, and manage the campaign that the number is assigned to.
When messaging has been ENABLED and a number has been assigned to a campaign, that number will be able to send and receive SMS/MMS messages.
Once your numbers have been approved, your texting services will be transferred to your Intulse numbers and you will be able to text via the Intulse App.
Automated Text Message Replies
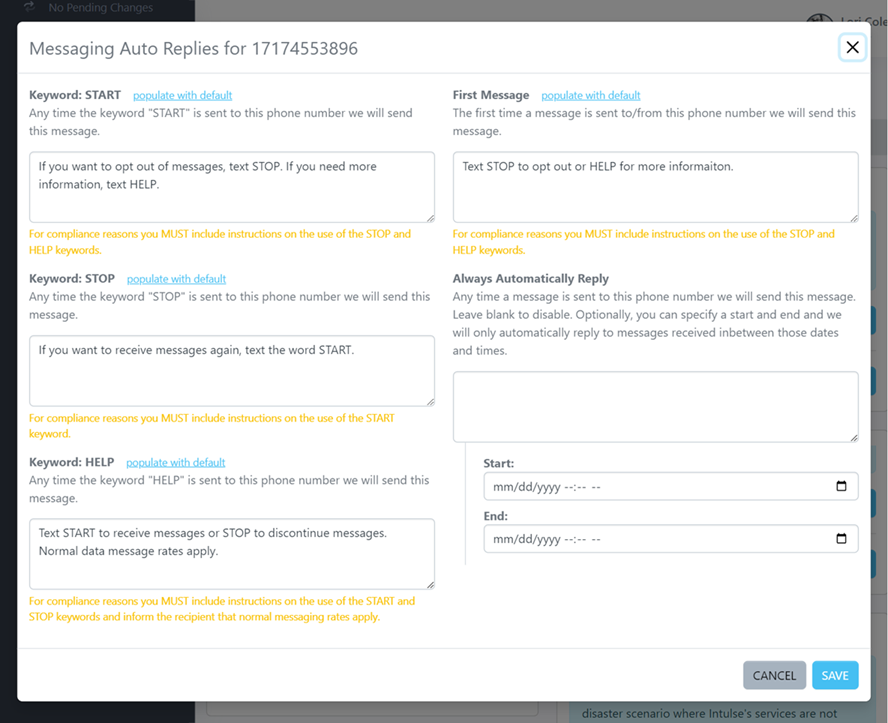
In a continued effort to minimize SMS SPAM, Intulse now uses industry standardized techniques to allow SMS recipients to OPT-IN or OPT-OUT of receiving messages. There are 4 basic messages that will automatically be triggered in an SMS text conversation: START, STOP, HELP, and FIRST MESSAGE.

Click the CONFIGURE button to set up or customize the automated replies for each text enabled phone number in your system. For each message, you can choose whether to populate the default text or draft your own message.
There is an optional field allowing you to draft a message that will be sent any time your number receives a text message. You also have the ability to specify a start and end date for that message to be sent.
Any customized replies must comply with the FCC rules about A2P text messages so be sure to follow the on-screen prompts when drafting your messages.
Campaigns
Click the "MANAGE" button if the number needs to be assigned to a campaign. This will take you to the 10DLC screen where you can assign the number to an active campaign. Click here for more information.
When E911 has been ENABLED for a number, an address will be assigned as the location where emergency services will respond should you ever need to dial 911 from your phone line.
Before you can enable this feature, you will need to create your E911 address under the E911 tab. More detailed instructions can be found here.
Each voice number can be assigned a failover route, which will be used to route calls in the rare case of specific outages with Intulse. When this feature is "ENABLED", your voice numbers can automatically be "failed over" to another destination, such as a cell phone. We recommend associating your phone numbers with a failover route for service reliability.
CNAM, more commonly referred to as Caller ID, can be enabled and disabled in this portion of the account center.
This article provides some helpful tips and information to help you successfully set up your CNAM.
New CNAM requests are manually reviewed on a daily basis by a support team. Please check back later to see if your request was approved. Once approved, the CNAM entry can be assigned to your phone number after it has completed porting. After being assigned, it can take up to a week for your name to show up as the Caller ID.
The Status History for this phone number can also be seen on this page. This may include the dates the number was purchased and transferred to Intulse.
