VOICE MENUS
Voice Menus allow you to direct calls coming into your organization based on a selection the caller makes on their keypad. Callers will hear a recorded greeting, presenting them with menu options which, when selected, will route their call to the corresponding destination.
Administrators have full access to the voice menus for your organization using the Account Center. Locate Voice Menus in the Phone System menu and expand the heading. Here you will see options to both Manage and Create voice menus.
CREATE VOICE MENUS
The Create Voice Menus page will allow you to create new voice menus for your organization. Voice Menus allow you to direct calls coming into your organization based on a selection the caller makes on their keypad. Callers will hear a recorded greeting, presenting them with menu options which, when selected, will route their call to the corresponding destination.
There are several System Recordings needed for a voice menu so you may want to look over this process and then create your recordings so you have them ready to attach to your new voice menu.
BASIC SETTINGS
Let's begin with the Basic Settings for your voice menu.
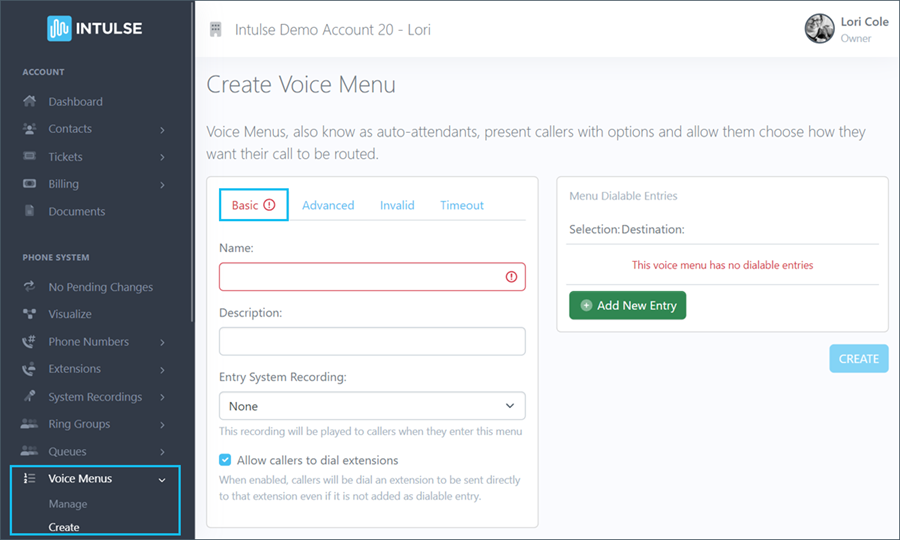
- Give your Voice Menu a Name that makes it easy to identify.
- Add a simple Description to help you remember the purpose of this Voice Menu.
- Select the System Recording that callers will hear, providing them with the menu options. If you haven't created this yet, make a note to create the recording and then come back and add it here after you have done so. Your recording should match the "Dialable Entries" that you will create later in this process.
- Decide whether to check the box that will Allow callers to dial extensions even if they are not included in the Dialable Entries list.
ADVANCED SETTINGS
Next, let's look at the Advanced Settings tab.
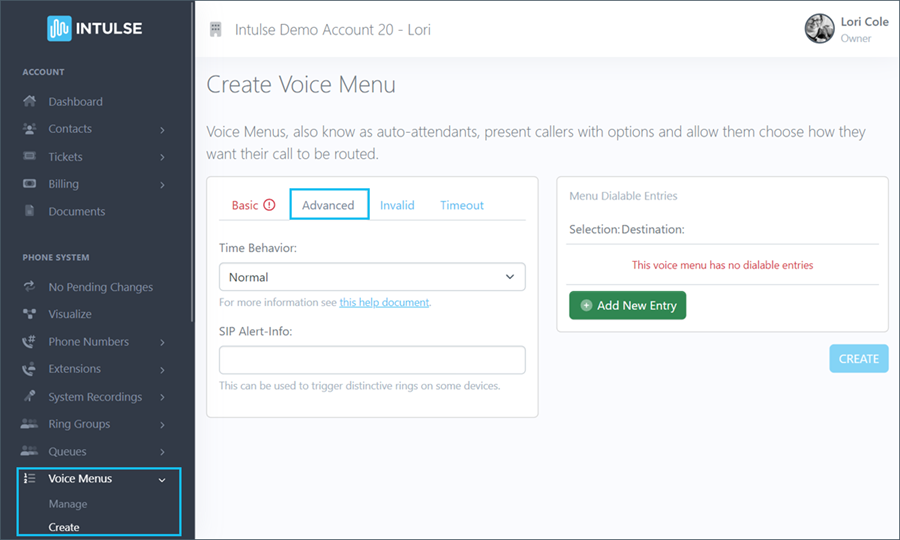
- Time Behavior has three different setting options:
- Normal means the entry will be dialed when the caller finishes making a selection.
- Wait for full timeout means the menu will wait the full timeout before trying to match entries. In other words, if you have dialable menu entries of 1 and 123, when the caller presses 1 it will dial entry 1, when they press 123 it will dial 123.
- Match immediately on first digits means the menu will match on the first digit that matches a dialable entry. In other words, if you have entries of 1 and 123, when the caller presses 1 it will dial entry 1. When they press 123, it will still match on the first entry, so it will dial 1.
- Enter SIP Alert Info: If you have physical phones and would like them to ring differently for calls coming through this voice menu, enter brief text in this field. You will enter the same text in your device settings, which will enable the distinctive ring.
INVALID SELECTION SETTINGS
Next are the settings for what the system should do when a caller makes an Invalid selection on their keypad.
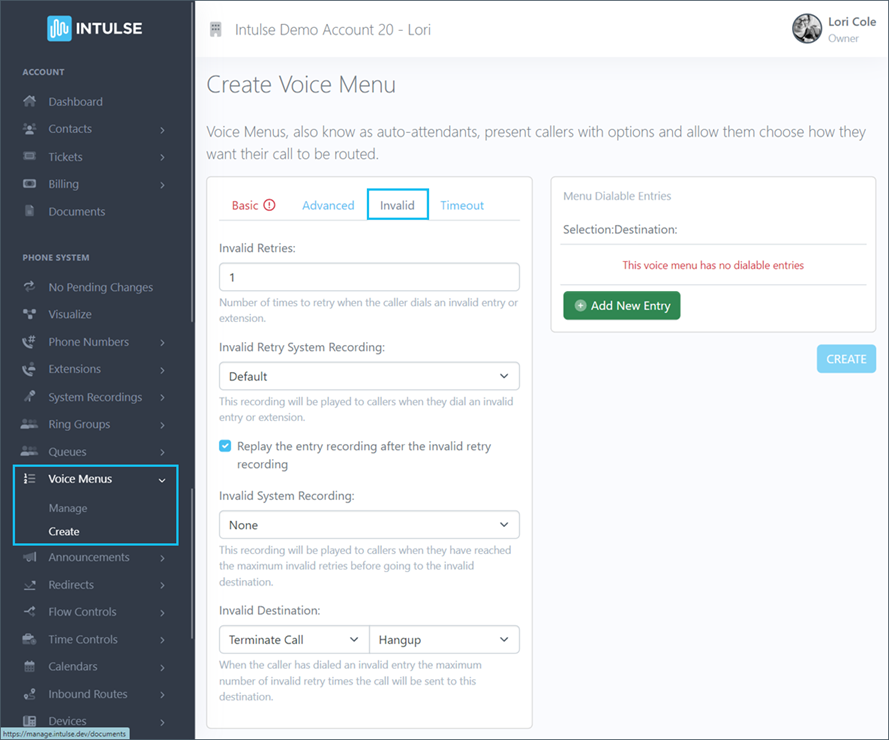
- Enter a number for Invalid Retries. This will determine how many times a caller gets to retry when they enter an invalid selection.
- Select the Invalid Retry System Recording which will play when a caller makes an invalid selection. If you haven't already done so, you will need to create this recording. It should simply tell the caller they have made an invalid selection and should try again.
- Decide whether to check the box to replay the initial system recording that you selected on the "Basic" settings page.
- Select the Invalid System Recording which will tell the callers they have reached the maximum number of invalid retries before sending them to the Invalid Destination. Again, you will need to make sure you have created this recording.
- Select the Invalid Destination which determines what happens to the caller once they have dialed an invalid entry the number of times selected above.
TIMEOUT SETTINGS
The last tab determines the settings for when a caller does not make a selection, causing the system to Timeout.
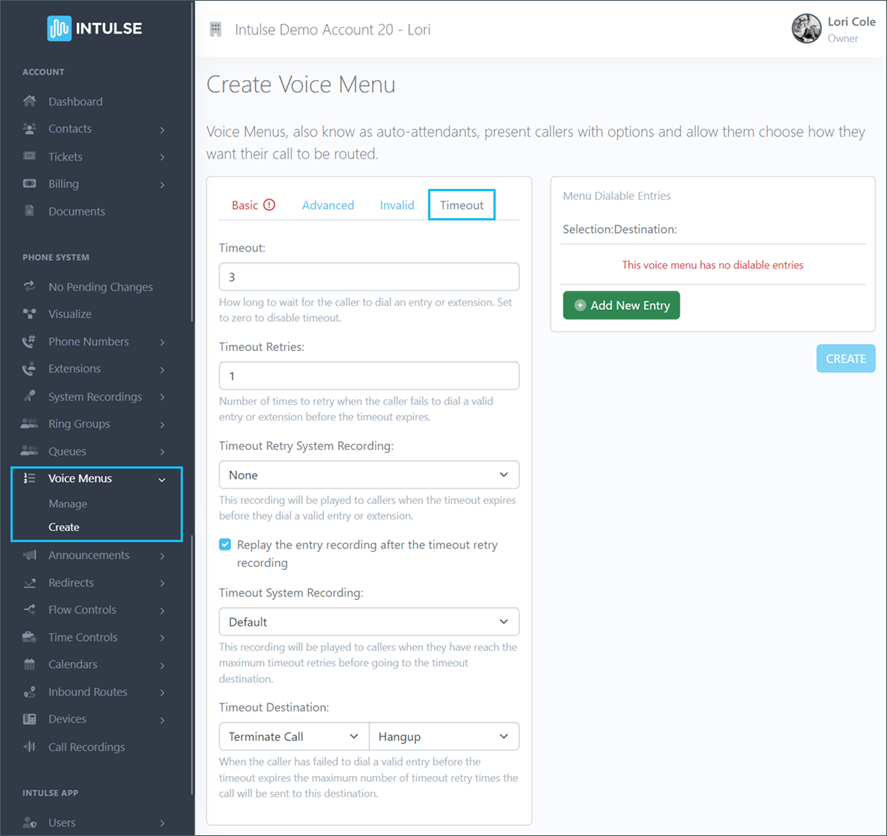
- Select the Timeout wait time in seconds. If you do not want the system to timeout at all, enter a zero in this field.
- Enter a number of Timeout Retries for how often the system should ask the caller to try again when they fail to select a menu option.
- Select the Timeout Retry System Recording which will prompt the caller to select an option from the menu. If you haven't already done so, you will need to create this recording.
- Decide whether to check the box to replay the initial system recording that you selected on the "Basic" settings page.
- Select the Timeout System Recording which tells callers they have failed to make a selection before sending them to the Timeout Destination. Again, you will need to make sure you have created this recording.
- Select the Timeout Destination which determines what happens to the caller once they have failed to dial a valid entry after the maximum number of retries entered above.
MENU DIALABLE ENTRIES
Finally, let's take a look at how to create the Menu Dialable Entries for your voice menu.
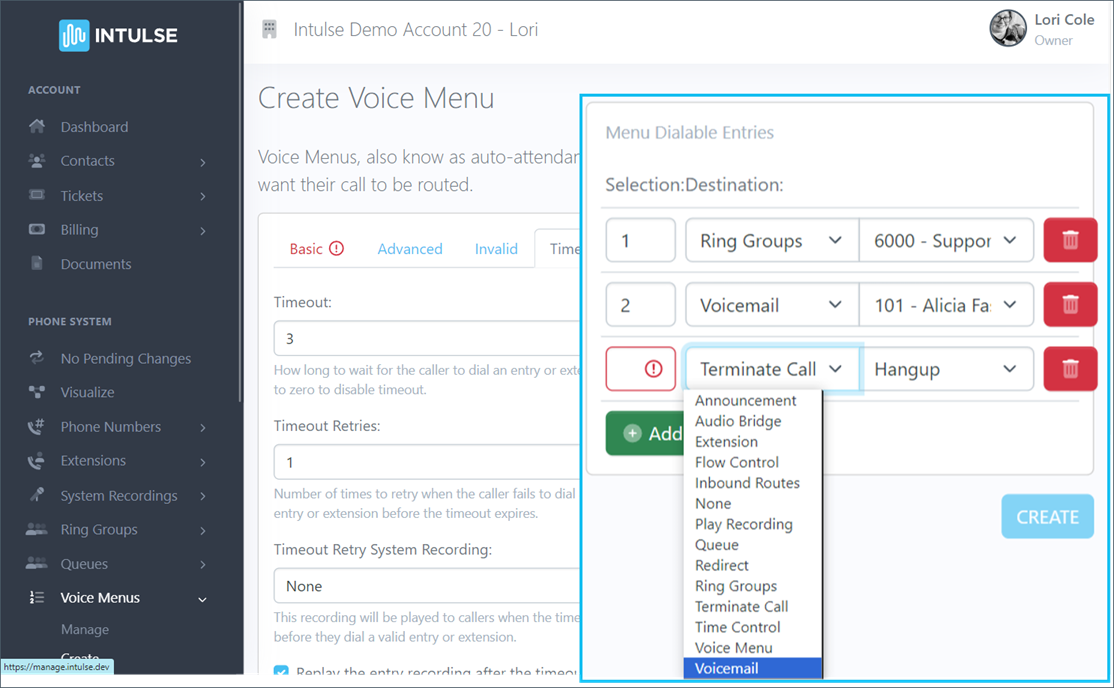
- Begin by deciding what number pattern you would like callers to choose in your menu options, such as 1, 2, 3, etc. and select Add New Entry when you are ready to begin entering your menu options.
- Enter the first Dialable Selection which is the number callers will select on their keypad.
- Select the Destination for that entry. There are several selections in the drop-down menu, such as Announcements, Extensions, Ring Groups, etc. Make sure any features selected here are set up and ready to go before you apply your changes.
- Repeat this process for each Entry you create.
- When finished, select Create and your new voice menu will now be available in your list of voice menus.
When you add a new voice menu, it will show up in your list of available voice menus. They are added to your call flow when selected within other system features.
Some changes related to your phone system's behavior, such as adding or editing voice menus, are not live immediately. Rather, the changes are "queued" and waiting to be applied. This allows you to make ALL of the necessary changes and verify that all pieces of the call flow are in place and functioning together as expected before making them live. Once you've tested your changes and are confident your system is functioning correctly, select "Apply Changes" on the left-hand menu to make your system live. A confirmation popup will open asking if you're certain you wish to apply your changes.
IMPLEMENTING VOICE MENUS
Voice Menus are added to your call flow when selected within other system features. For example, in the call flow shown below, the voice menus were selected as options within the time control feature.
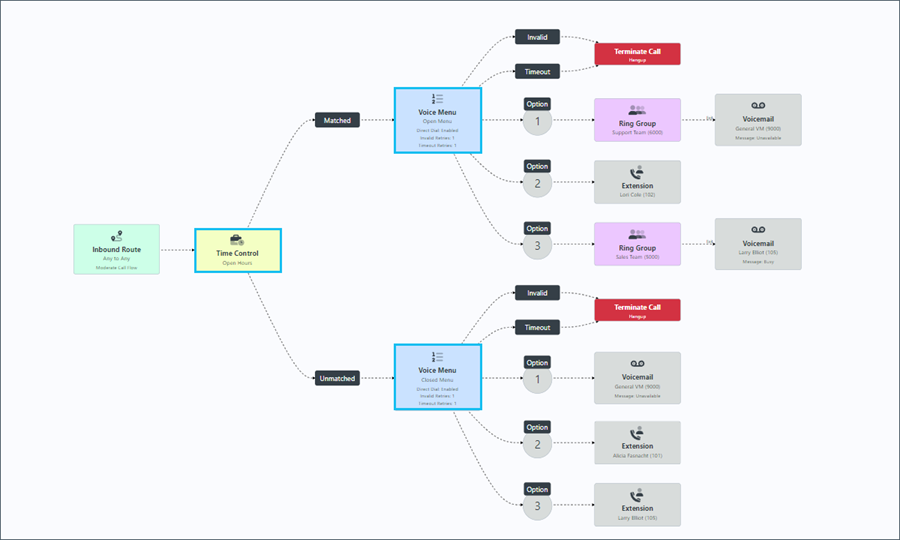
This can be accomplished by going to Time Controls in the Account Center or by selecting a specific time control on the Visualize screen. From the settings screen, you can select the voice menu(s) you would like to attach.
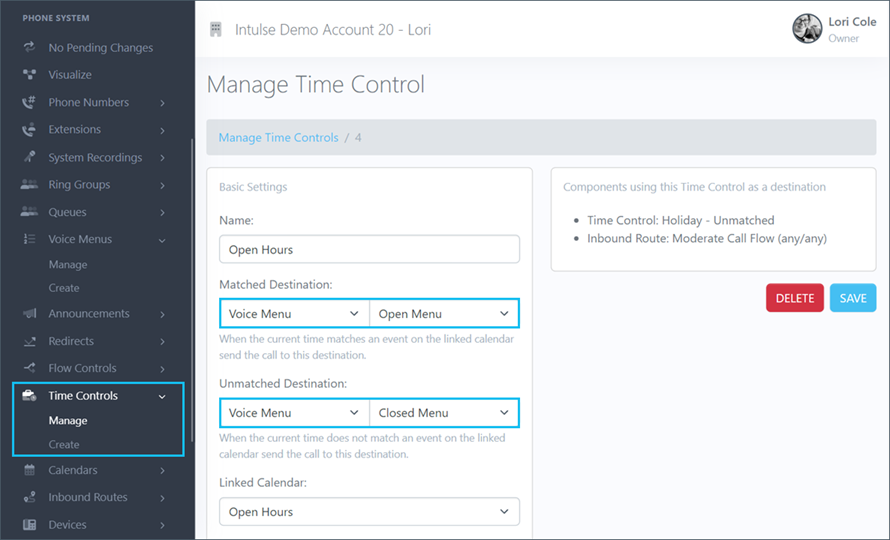
Calls can also be sent to voice menus from any other system feature.
- You could choose to have every call coming to an inbound route to go directly to a voice menu.
- Maybe there is an announcement you want all callers to hear before sending them to a voice menu.


