The Intulse integration with Salesforce connects your phone system with your Salesforce account, giving you faster access to client details and easier communication tools.
Salesforce Integration Key Features
Instant Caller ID Matching
- The Intulse App automatically searches Salesforce for any matching contact or organization records whenever a phone number appears.
- Incoming calls display the caller’s name from Salesforce, not just the number.
- Click the caller’s name to open their record directly in Salesforce.
Automatic Call Logging
Each call log includes:
- User and extension involved
- Call date and start time
- Duration of the call
- Direction (inbound or outbound)
- External phone number
- If the call was recorded, the recording is automatically attached.
- You can easily add your own notes or commentary to any call log.
Text Message Logging
- Text messages sent to or received from Salesforce contacts can be logged automatically.
- Nightly logging ensures message records are kept up to date.
Click-to-Call & Messaging
- Start calls or send texts to Salesforce contacts directly from the Intulse App by searching for a contact name on the My Phone screen.
- With the Intulse Companion App installed in your browser, initiate calls and texts directly from Salesforce by clicking any phone number.
To experience the integration between Intulse and Salesforce, you will need to use the Intulse App.
If you would like to have the Salesforce integration enabled for your account, please contact Intulse support and we would be happy to get you connected.
CONNECTING SALESFORCE TO INTULSE
This guide assumes that you have already installed and logged into the Intulse App on your favorite device. If you need help installing and navigating the App, click here for a complete walkthrough.
Our Salesforce integration functions like our other integrations but due the complexity of the Salesforce platform, extra steps must be completed within Salesforce in order for the integration to work. These settings are accessed differently, depending on whether you are using the newer Salesforce lightning platform or their classic platform. Once you have accessed the settings for your platform, continue on to the instructions for setting up and connecting your apps.
Salesforce Lightning Setup
Setup of a new API app requires certain user policies. If you are unable to complete the following steps, please contact an administrator within your organization.
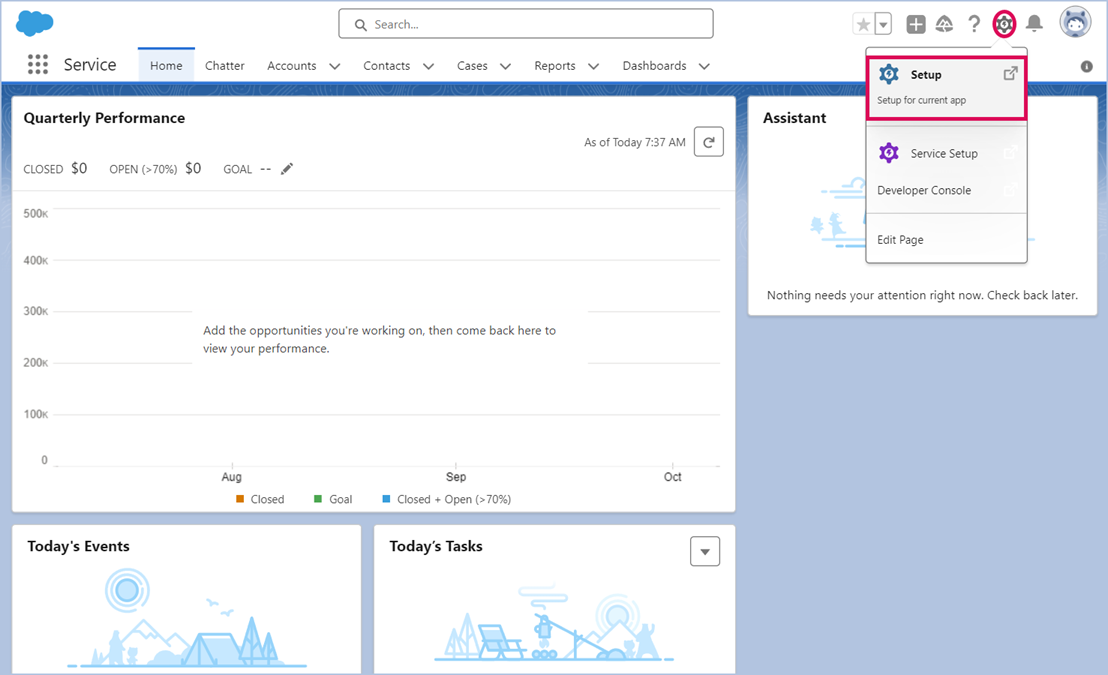
- Click the gear in the top right corner of your browser window and select Setup.
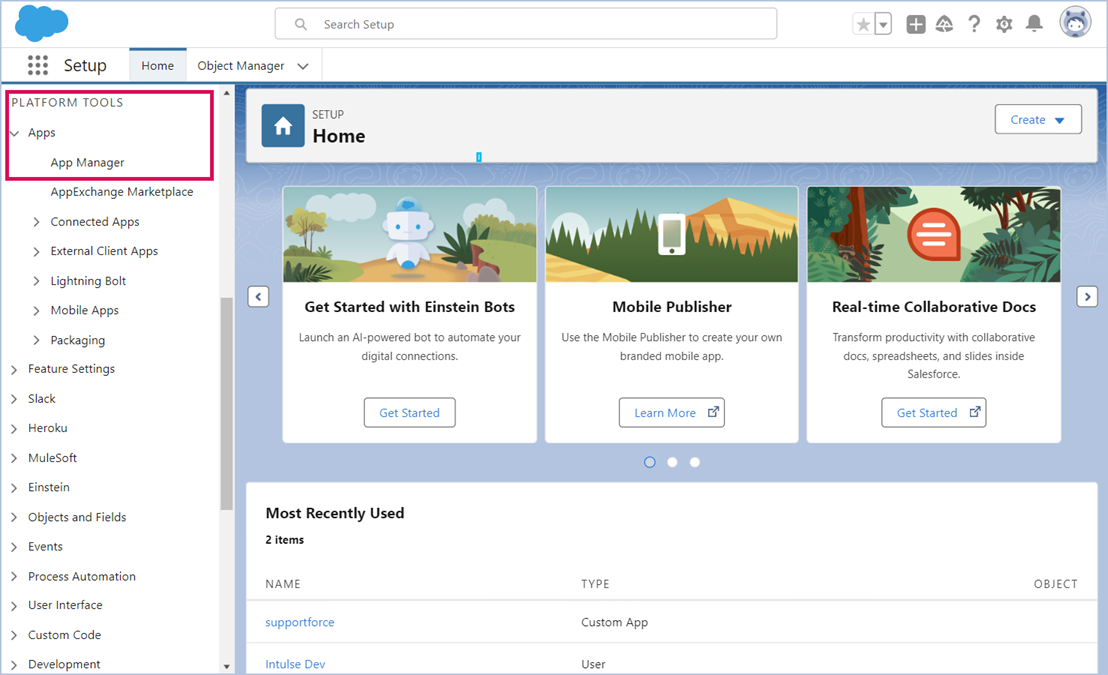
- On the left hand menu, scroll down to Platform Tools and expand the Apps menu.
- Select App Manager.
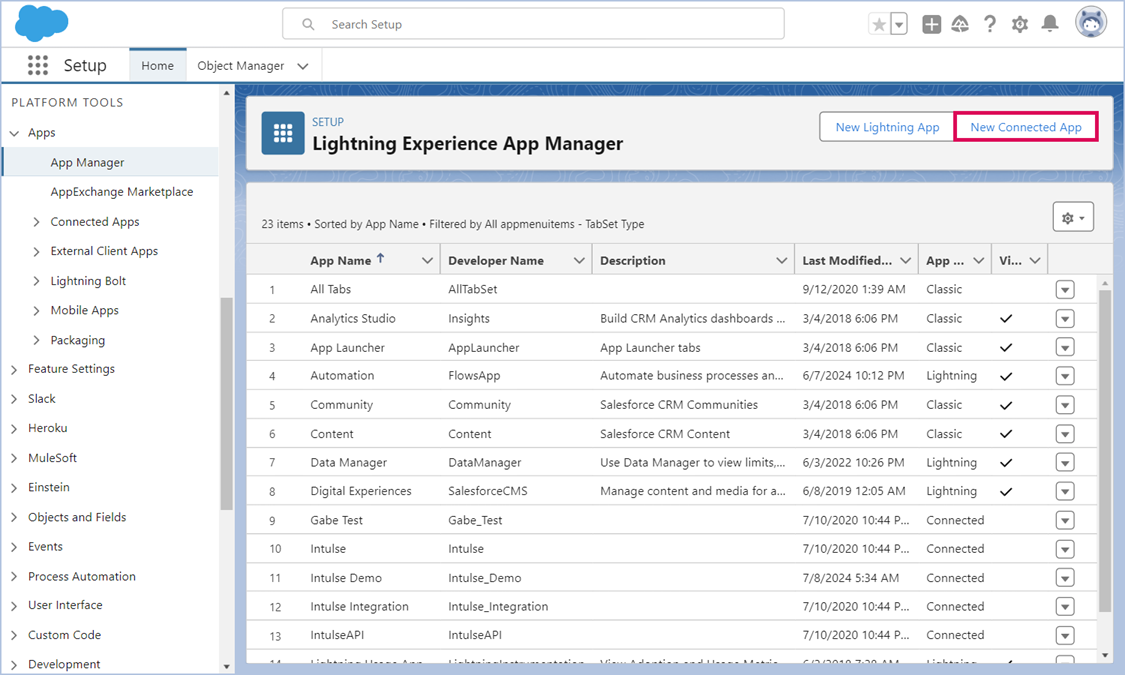
- Select New External Client App.
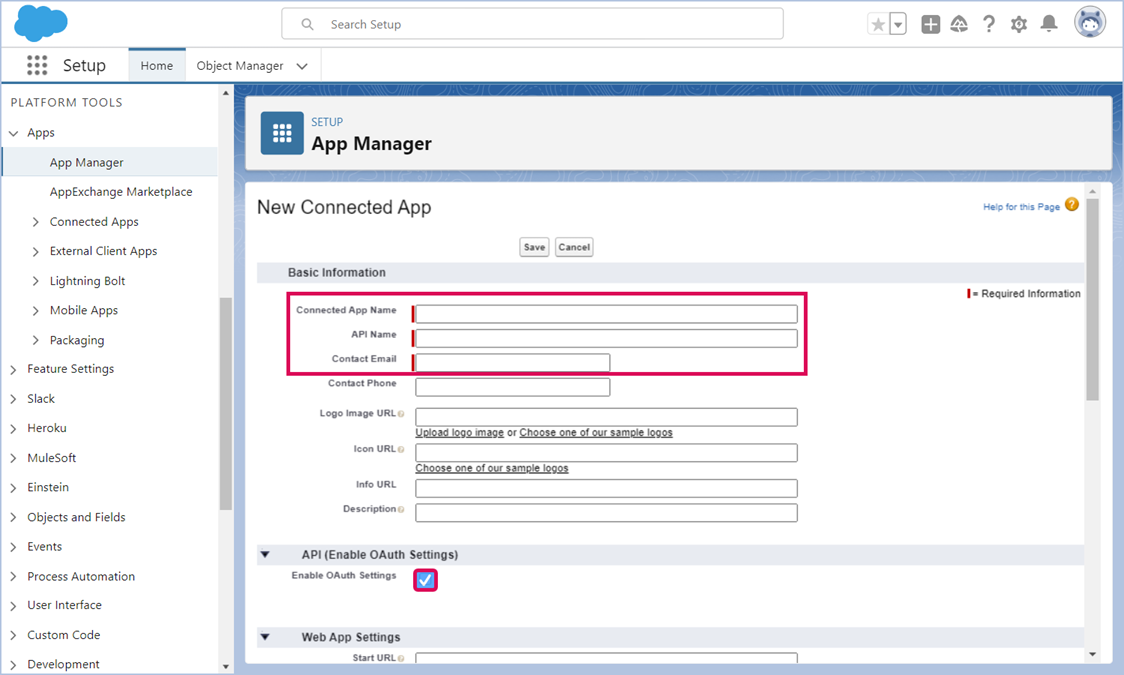
- Enter the App Name and Contact Email.
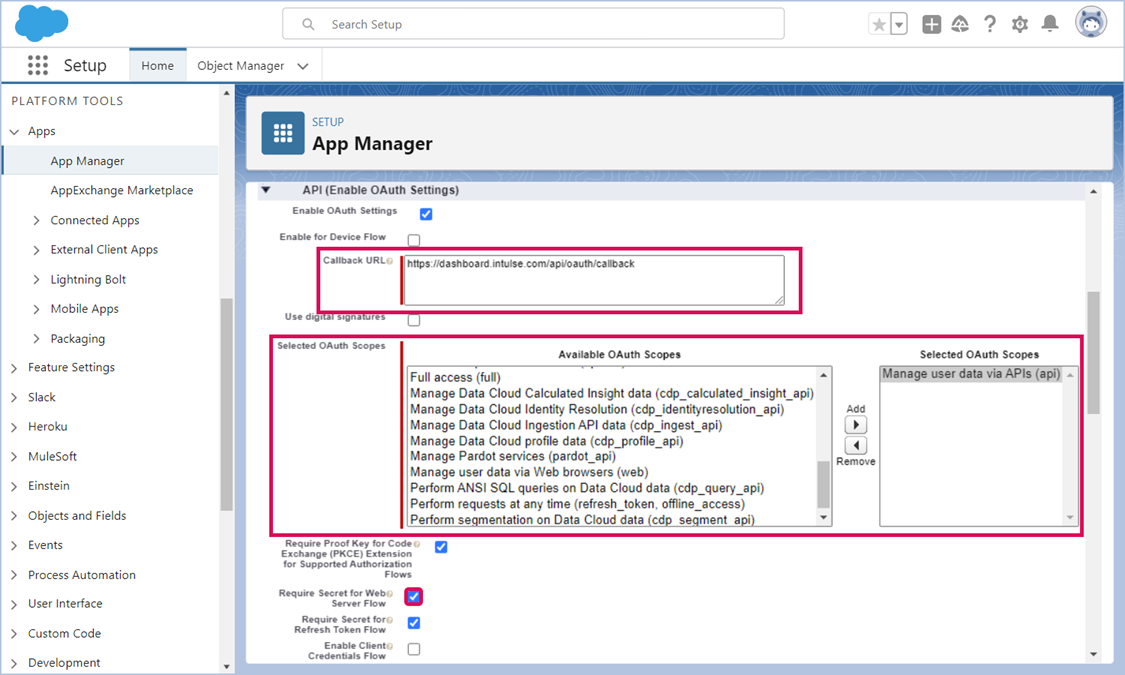
- Expand the API (Enable OAuth Settings) menu and check the box beside Enable OAuth.
- Under the App Settings, enter this Callback URL: https://app.intulse.com/api/oauth/callback
- Under OAuth Scopes, choose Manage user data via APIs and click the arrow to add it to Selected OAuth Scopes.
- Leave Require Secret for Web Server Flow checked in the Security section.
- Click Create.
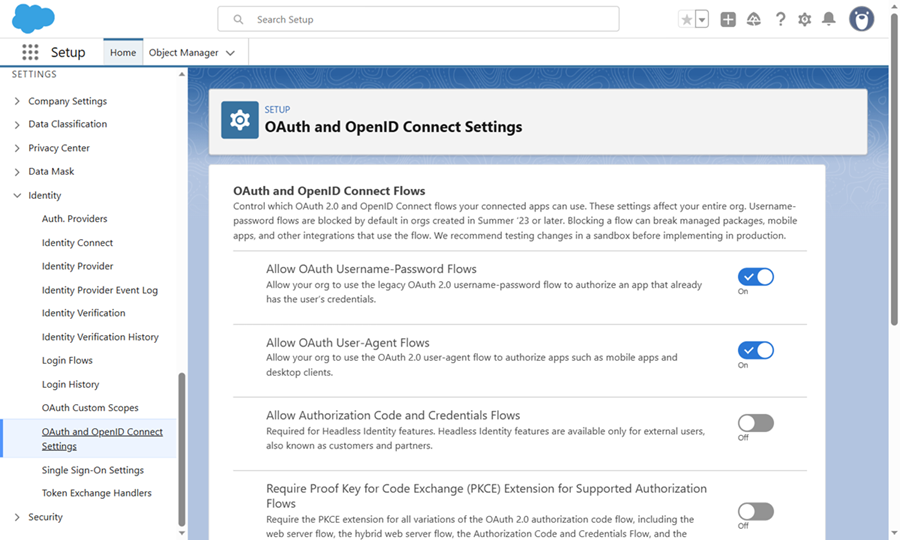
- Scroll down to the Settings menu and expand Identity.
- Select OAuth and OpenID Connection Settings
- Toggle ON Allow OAuth Username-Password Flow.
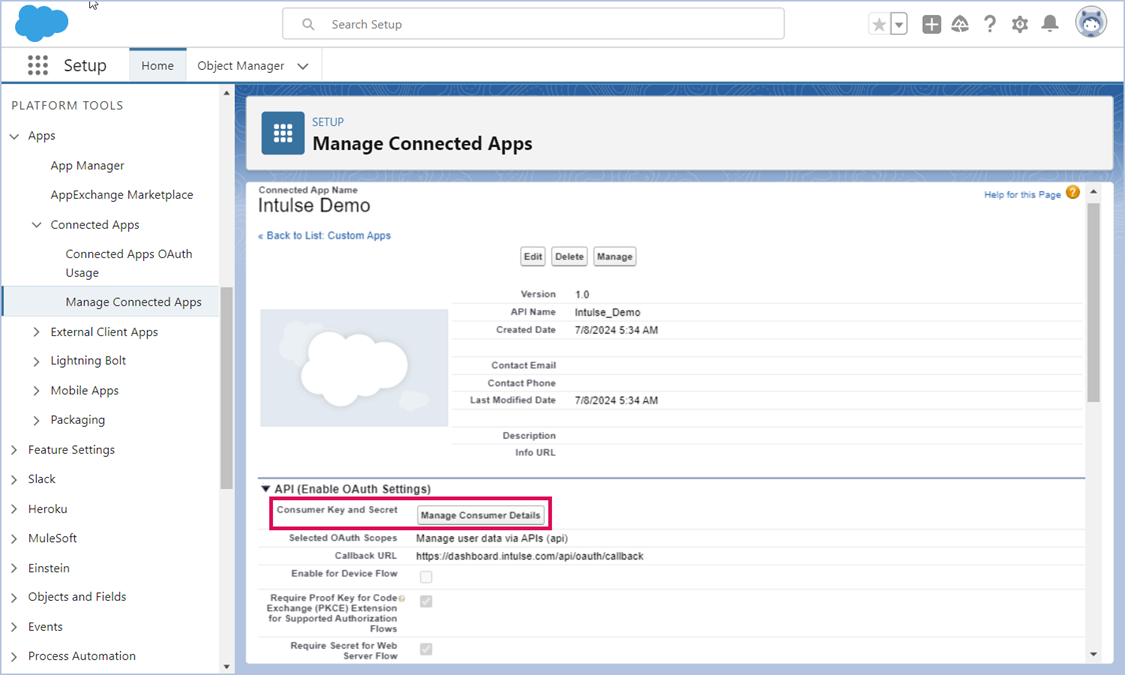
- Go to Apps > App Manager and click on the arrow to the right of the app then select View from the dropdown list.
- Locate the Consumer Key and Consumer Secret. You will need to enter those in the Intulse app in a later step. You may need to click Manage Consumer Details to reveal this information.
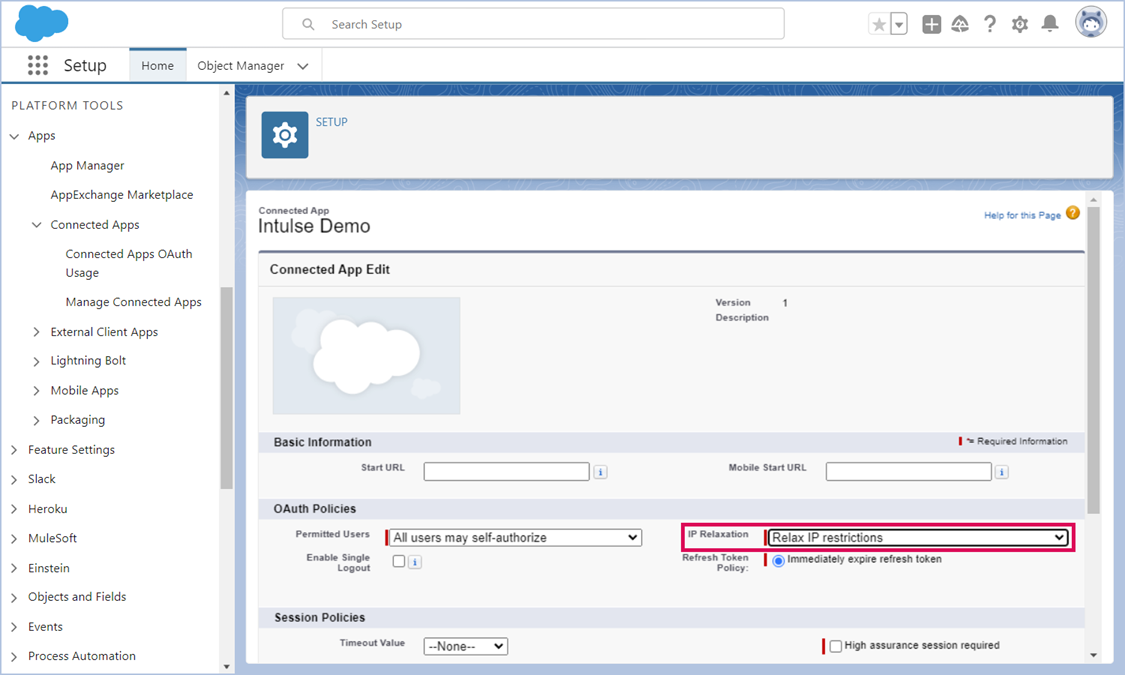
- From here, click on Manage and on the next screen, click Edit Policies.
- Change IP Relaxation to Relax IP Restrictions.
Salesforce Classic Setup
Setup of a new API app requires certain user policies. If you are unable to complete the following steps, please contact an administrator within your organization.
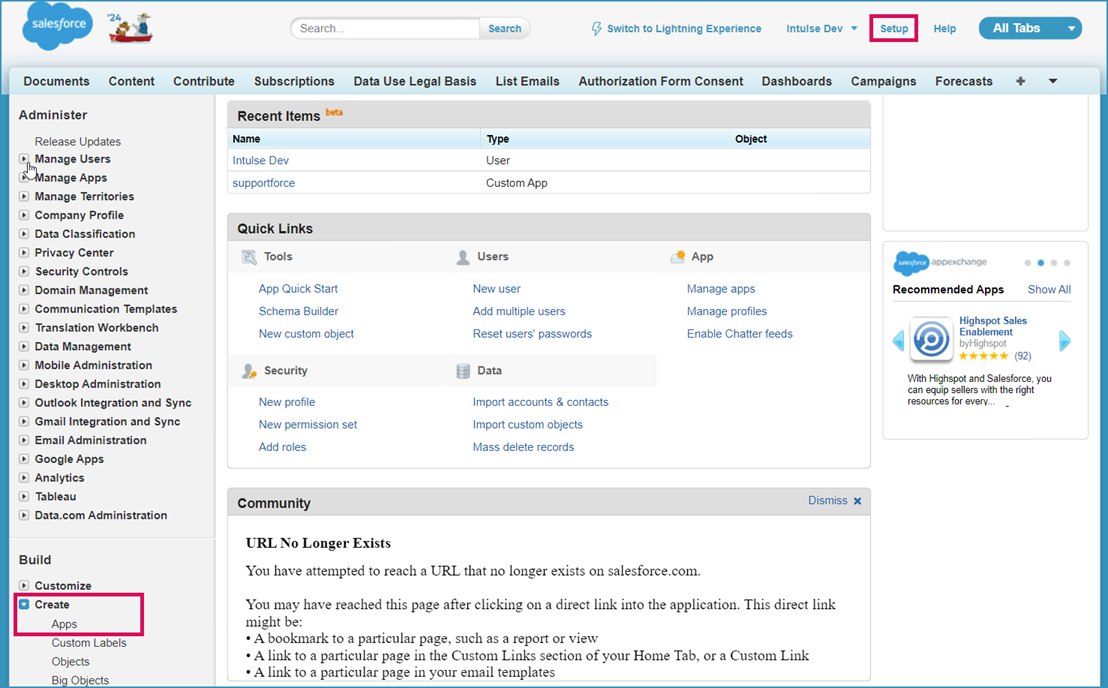
- Select Setup from the menu options at the top of your page.
- On the left hand menu, scroll down to Build and expand the Create menu.
- Select Apps.
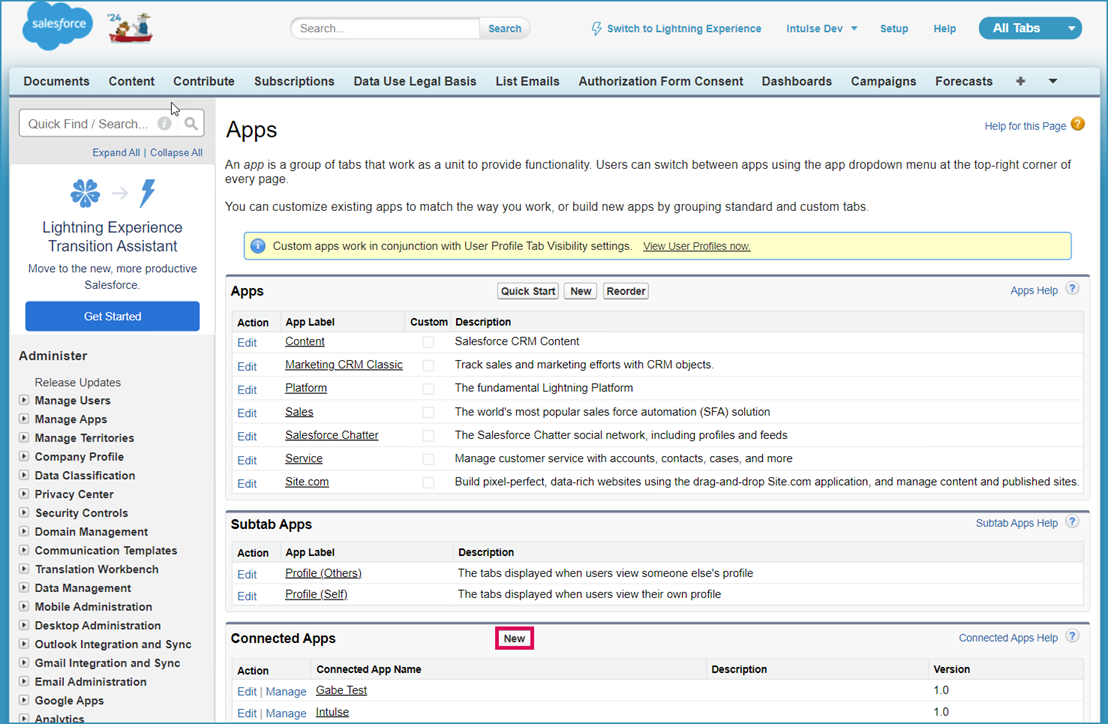
- Under Connected Apps, click New.
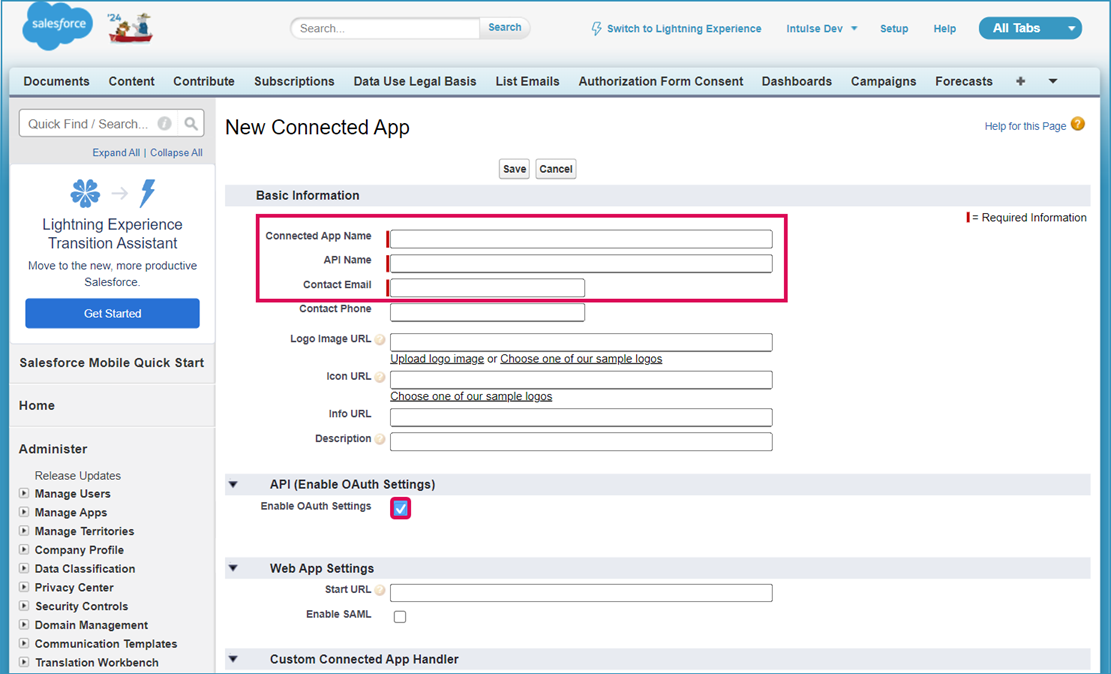
- Enter a Connected App Name, API Name, and Contact Email.
- Check the box beside Enable OAuth Settings and more options will appear.
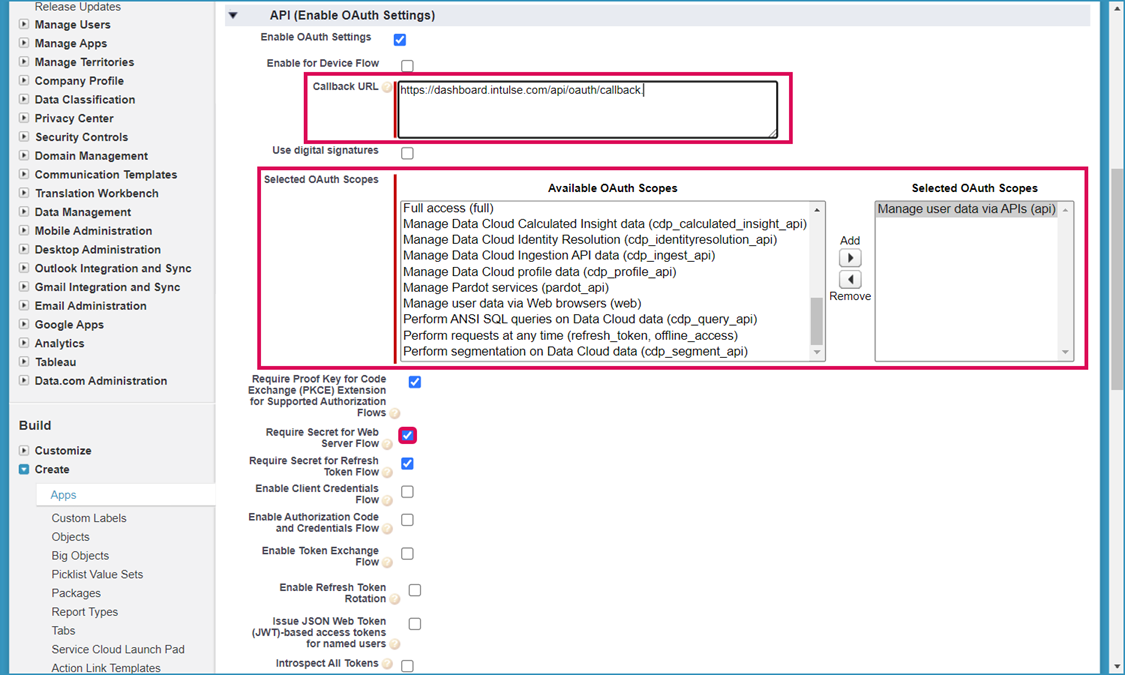
- Under the API settings, enter this Callback URL: https://app.intulse.com/api/oauth/callback
- Under Selected OAuth Scopes, choose Manage user data via APIs and click the Add BUTTON.
- Leave Require Secret for Web Server Flow checked.
- After saving, it should take you to a page with the details of the app you just created. If this does not happen automatically, go to Build > Create > Apps and click on the name of the newly created app.
- Locate the Consumer Key and Consumer Secret. You will need to enter those in the Intulse app in a later step. You may need to click Manage Consumer Details to reveal this information.
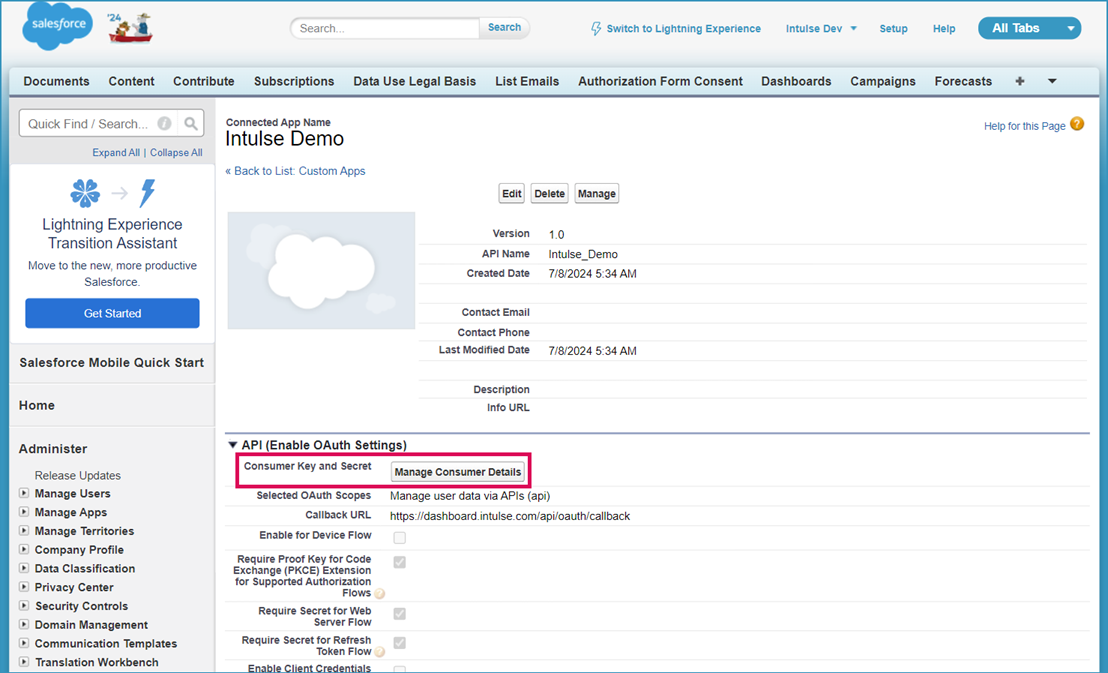
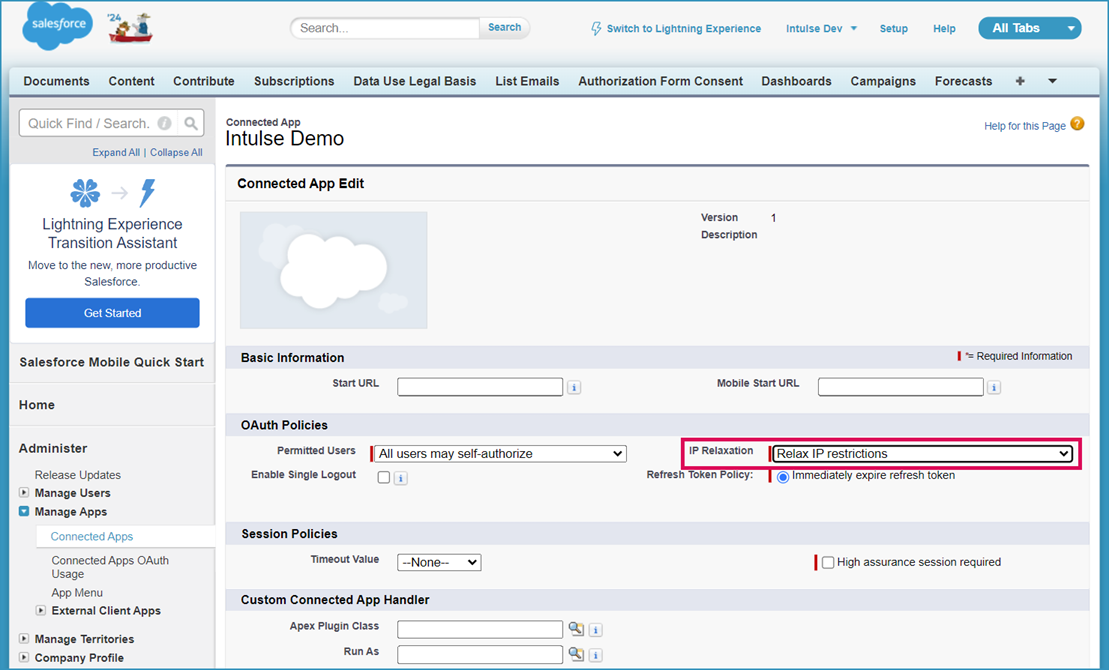
- From here, click on Manage and on the next screen, Edit Policies.
- Change IP Relaxation to Relax IP Restrictions.
- Save these settings.
- Continue to the final steps of Connecting your Salesforce App to the Intulse App.
Connecting your Salesforce App to the Intulse App
System Administrators
Once a system administrator of your Salesforce and Intulse accounts completes the following steps, all users will need to log into the app with their Salesforce username and password.
Open the Intulse App and select the More menu tab. Click Integrations and select Salesforce from the list.
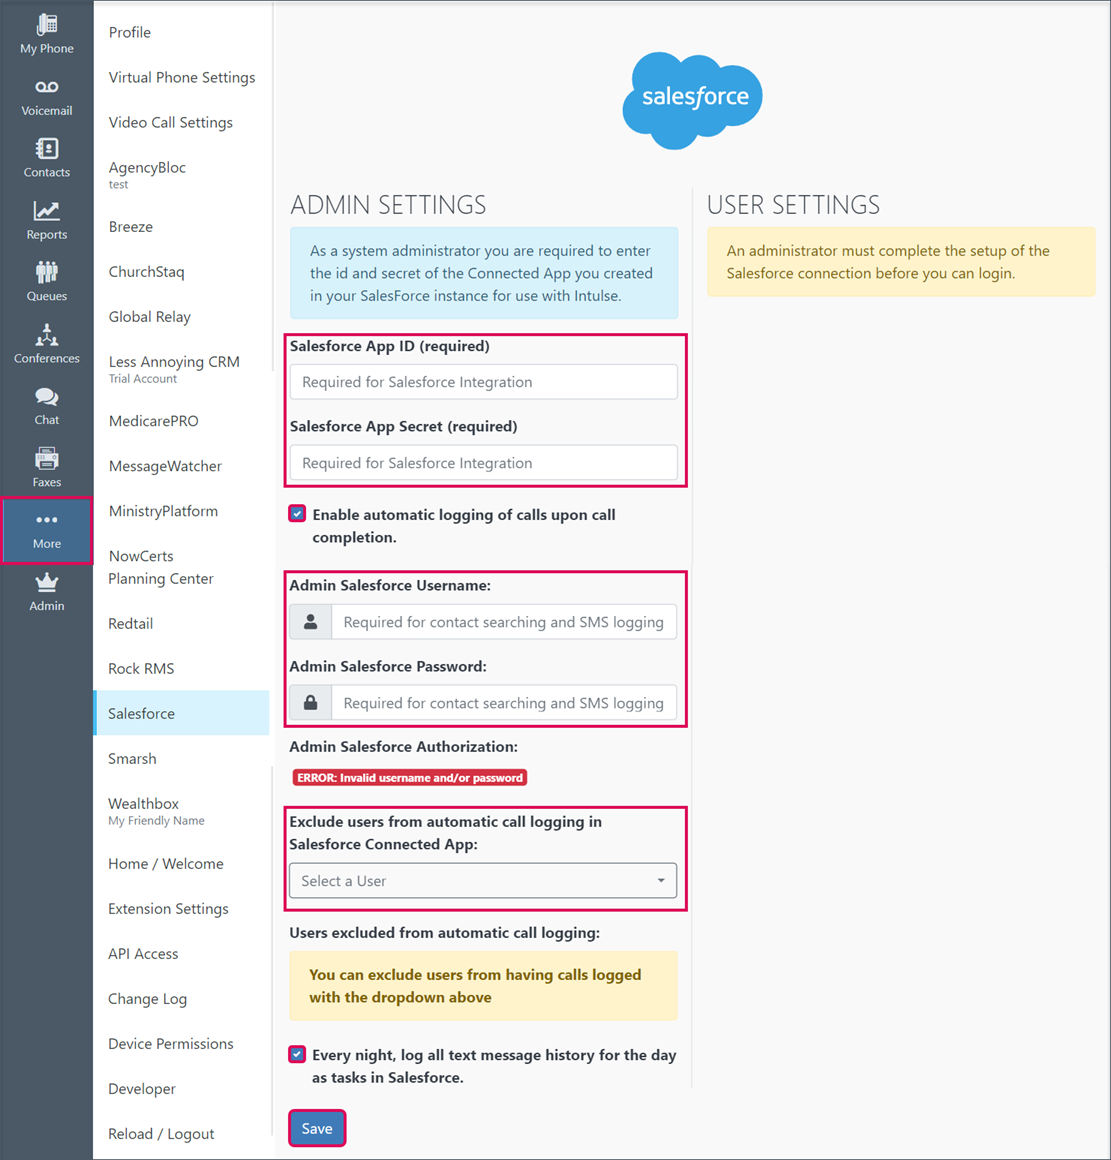
- Enter your Salesforce Consumer Key.
- Enter your Salesforce Consumer Secret.
- Enter your Salesforce Username.
- Enter your Salesforce Password.
- Select whether to Enable automatic call logging. This will cause every incoming and outgoing call that can be matched against a contact to be logged after the call ends.
- Text message logging is turned off by default. Choose whether to create a log of all text message conversations. If selected, each night a log will be created for all text message conversations that took place that day. Each conversation will be logged as one complete file, showing each message sent or received within that conversation.
- Use the drop-down list to select users who should be excluded from automatic call logging.
- Click the Save button to save your changes.
All Users
Once your system administrator has completed setting up the integration for your organization, each user on the Intulse system must complete the following steps.
- Open the Intulse App and select the More menu tab.
- Click Integrations and select Salesforce from the list.
- Enter your Salesforce Username & Password.
- Click the Save button to save your changes.
In order to fully benefit from this integration, both Salesforce and the Intulse App should be open and running in the background of your device.
For more information about Salesforce, check out their website!
