Intulse Logo

ADMIN


The Admin section of the App allows you as the system administrator to manage what users can see and access within the Intulse App. Permissions can be assigned to everyone, limited to no one, or assigned to selected users or groups of people based on security roles.

The entire Admin section is only visible to those users who have been assigned the Admin role.

SECURITY ROLES


Security roles can be used to organize users into various roles, which can then be assigned a variety of permissions. This is easier than assigning permissions directly to users because all permissions can be changed by simply reassigning a role rather than having to change each individual permission.

CREATE A ROLE

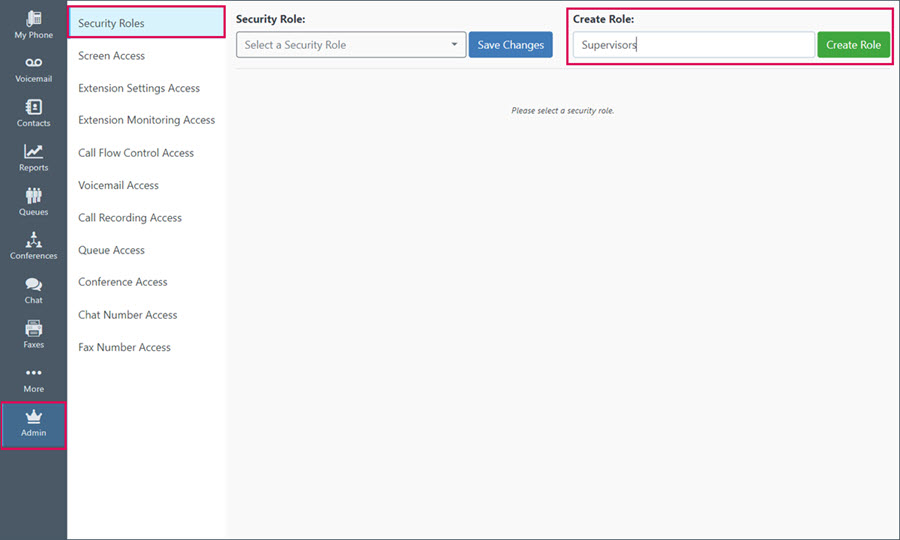
Enter a New Role Name and click Create Role.
Click the green plus sign to add users to that role.
Then click the blue Save Changes button.
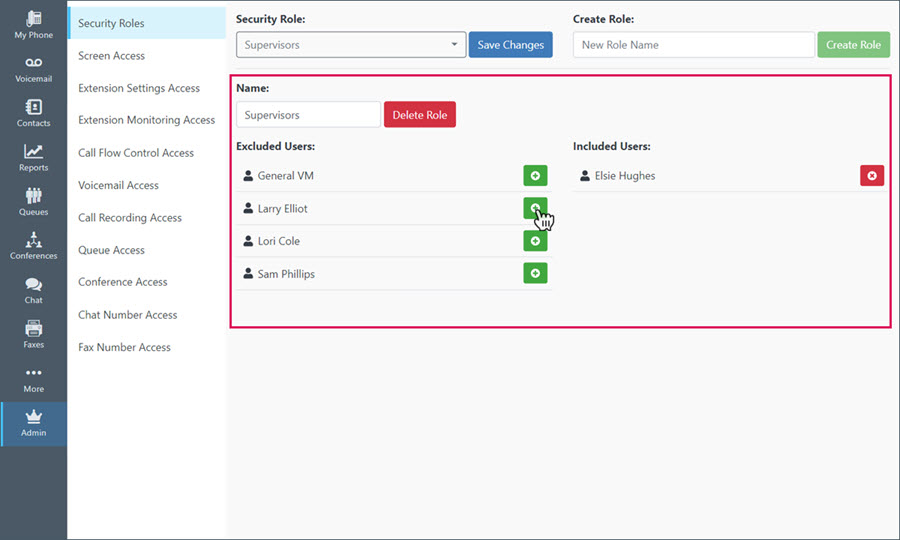
Click the red x anytime you want to remove a user from that role.

EDIT A ROLE

To edit an existing security role, select the role you want to edit from the drop-down list at the top of the screen.
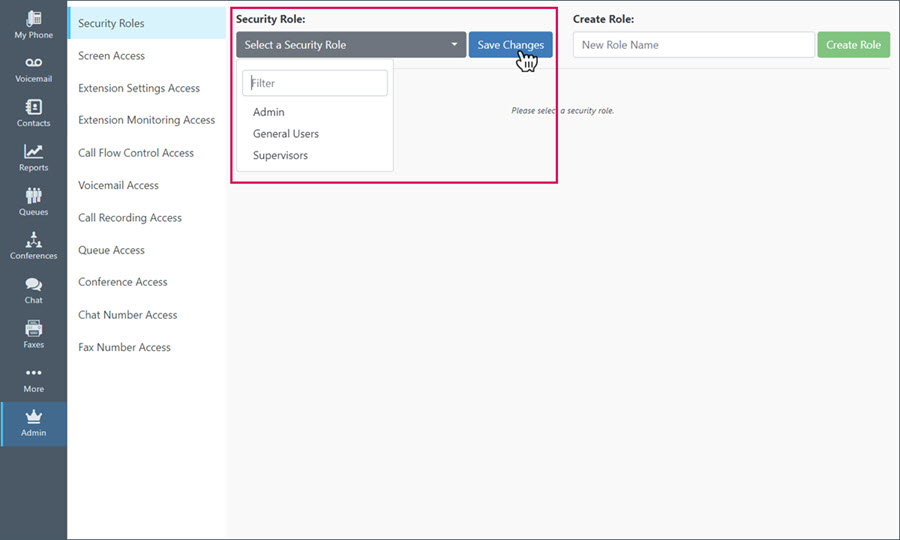
You can edit any of the following information:
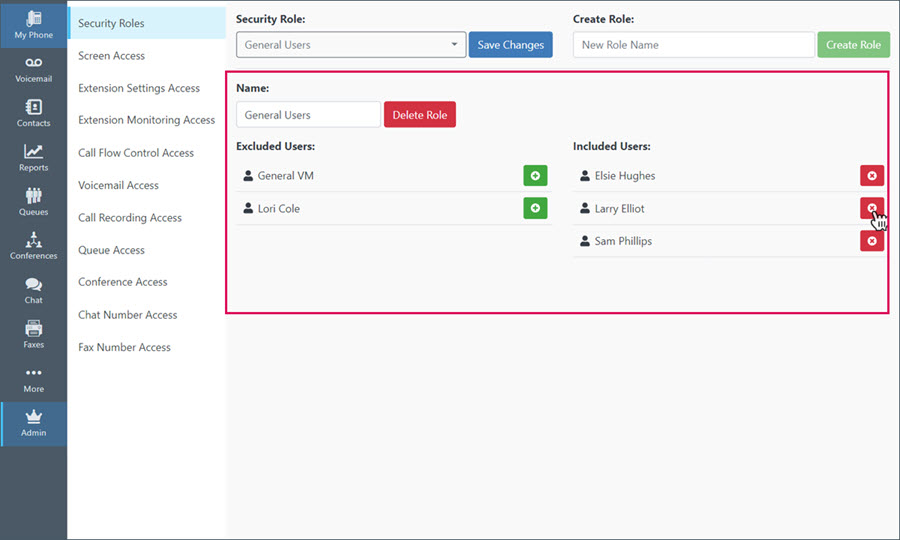
  • Rename the role by typing in the Name field.
  • Delete the role by clicking the red Delete Role button.
  • Add users to the role by clicking the green plus button beside any name on the Excluded Users list as these are the people currently being excluded.
  • Remove users from the role by clicking the red x button beside any name on the Included Users list as these are the people currently being included.

SCREEN ACCESS


You can control the visibility of entire screens within the Intulse app by selecting specific users, or based on the security roles you created above.

  • By default, all screens are visible to everyone in your organization.
  • If you choose to hide a screen from everyone or make it only visible to some users or security roles, this will also affect Admin users.

Use the drop-down to Select a Screen.
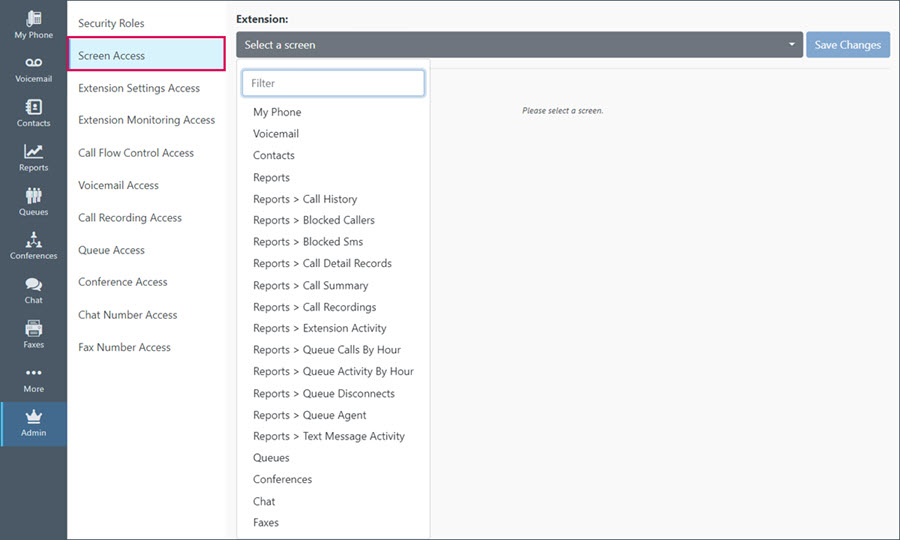
Each screen has 3 permission options:
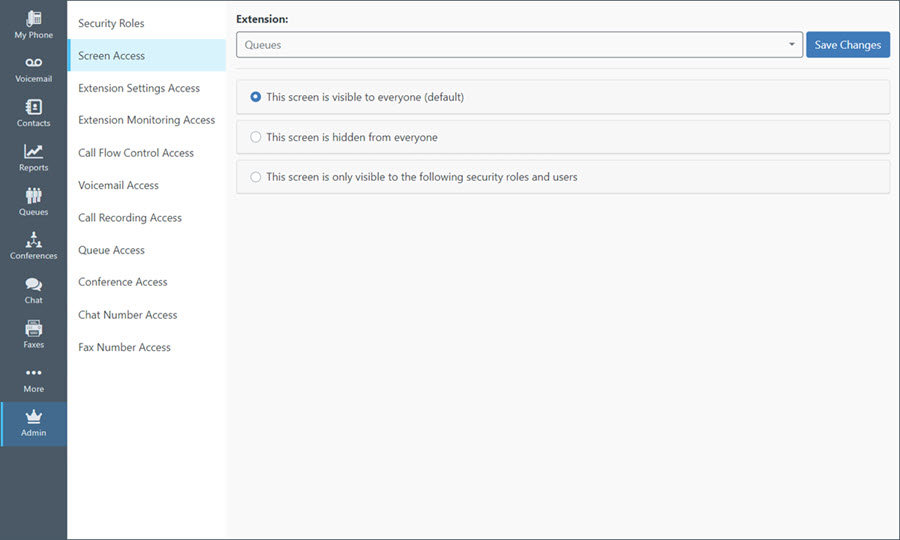
  • This screen is visible to everyone. This is the default setting.
  • This screen is hidden from everyone.
  • This screen is only visible to the following security roles and users.

Assign specific users or security roles the same way you did when creating the security roles.
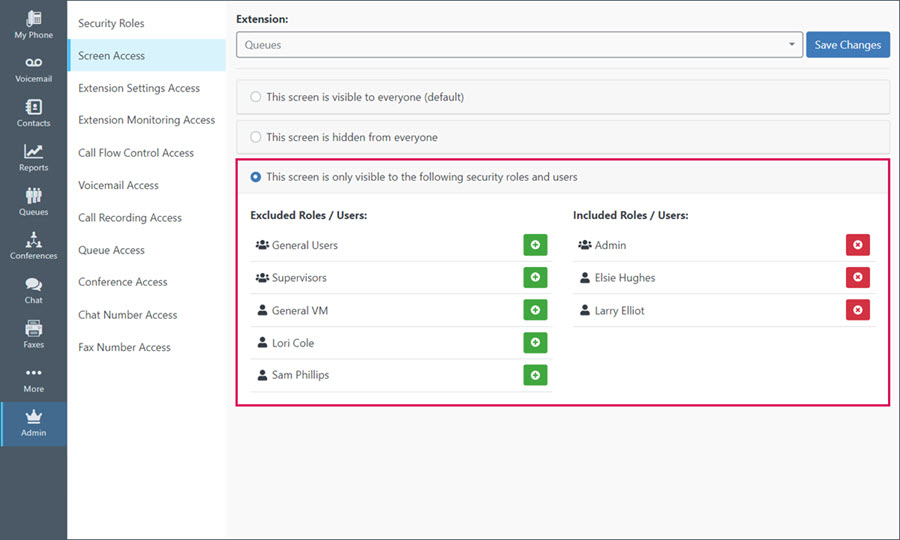
  • Add roles or users by clicking the green plus button beside any security role or user's name on the Excluded Roles/Users list as these are the people currently being excluded.
  • Remove roles or users by clicking the red x button beside any role or user's name on the Included Roles/Users list as these are the people currently being included.
  • Then click the blue Save Changes button.

EXTENSION SETTINGS ACCESS


Administrators can control who has access to the settings for each extension. For example, if you have an extension that is monitored by multiple people, you can determine who has the ability to set that extension to Do Not Disturb, Call Waiting, and Call Forward. Users will also be able to adjust Follow Me and Smart Monitoring settings for the extensions to which they have access.
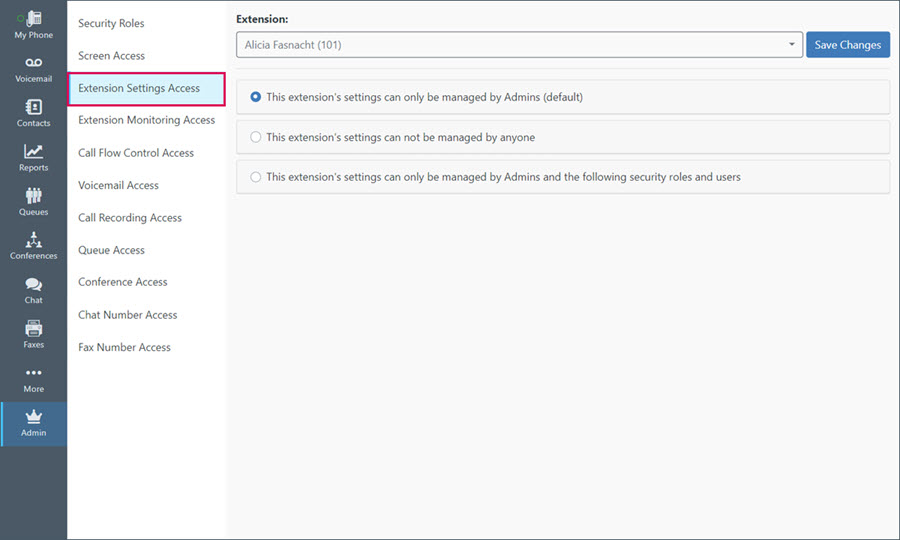
Select the extension you wish to edit from the drop-down at the top of the screen. Each extension has 3 permission options:
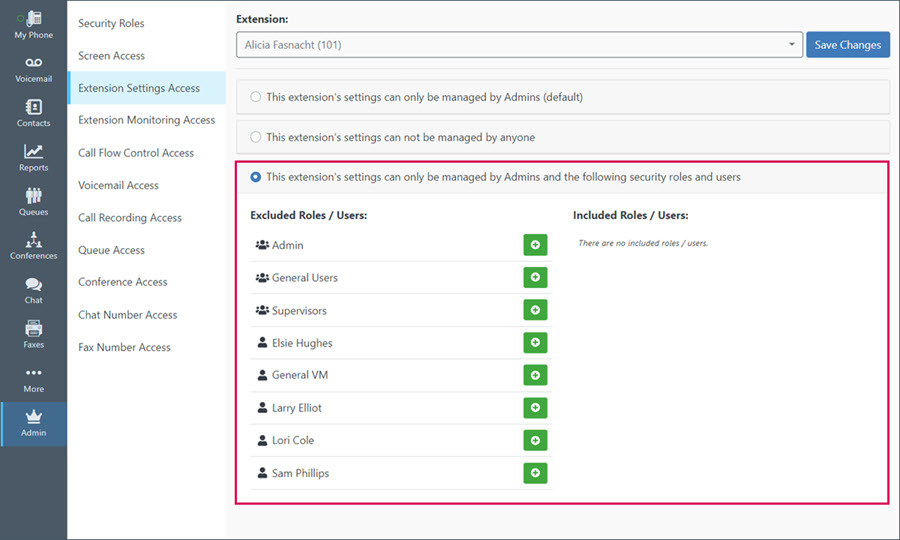
  • This extension's settings can only be managed by Admins means that no one other than administrators and the user on that extension can manage these settings. This is the default setting.
  • This extension's settings can not be managed by anyone means that only the user on that extension can manage these settings.
  • This extension's settings can only be managed by Admins and the following security roles and users will allow you to select specific security groups and users once selected. Only those selected would have access to the settings for that extension.
    • Add roles or users by clicking the green plus button beside any security role or user's name on the Excluded Roles/Users list as these are the people currently being excluded.
    • Remove roles or users by clicking the red x button beside any role or user's name on the Included Roles/Users list as these are the people currently being included.
    • Then click the blue Save Changes button. Once assigned, extension settings are located under the More tab.

EXTENSION MONITORING ACCESS


Smart Monitoring allows you to monitor other extensions within your organization. You can see a caller's status, whether they're available, and who they are on the phone with. This can be configured by each user, or for each user by a system administrator.

The Extension Monitoring Access Admin screen allows you, as the system administrator, to designate what can be viewed for each extension.
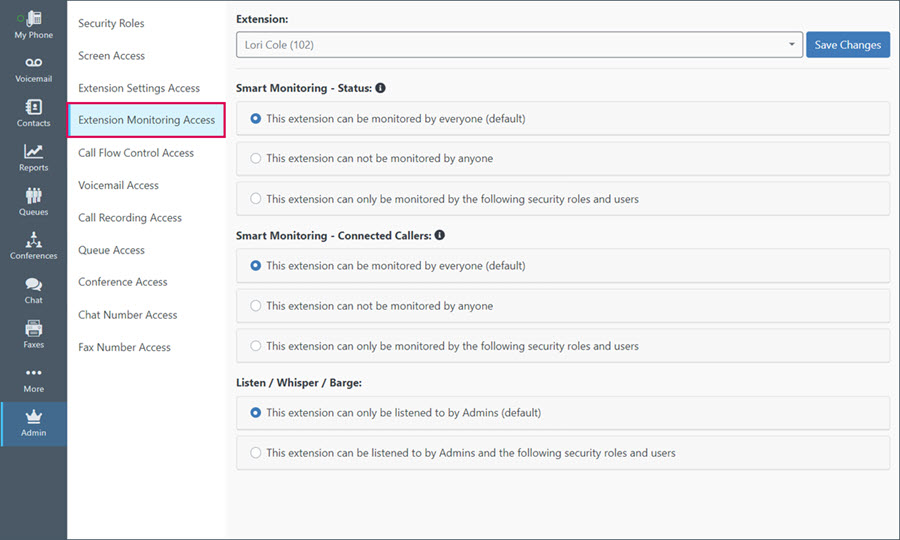
Select the extension you wish to edit from the drop-down at the top of the screen. By default, an extension's status and connected caller information can be monitored by everyone, but only an Admin can Listen/Whisper/Barge on an extension.
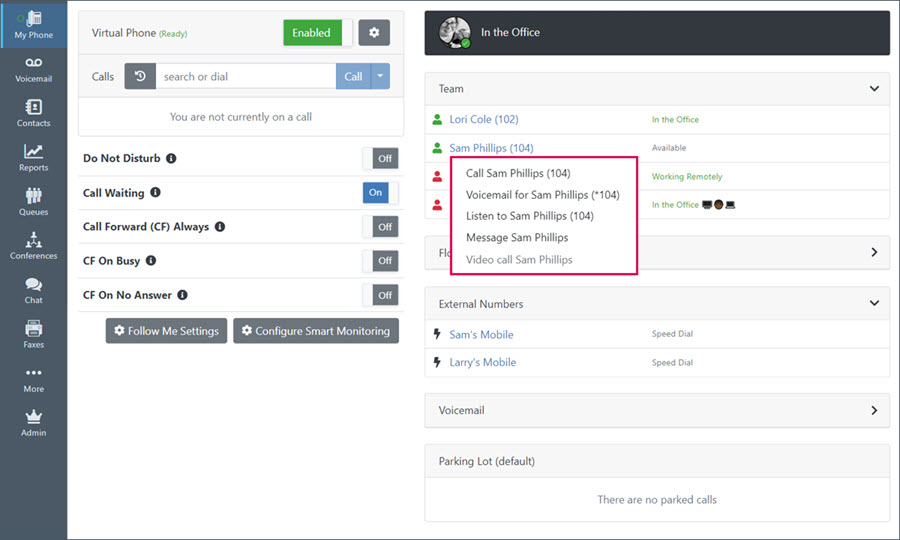
  • Smart Monitoring - Status gives permission to view a user's status and see whether the extension is set to Available, In Use, Do Not Disturb, etc. This is available to everyone by default.
  • Smart Monitoring - Connected Callers gives permission to monitor the caller name or phone number with whom a user is currently on a call.
    • Sometimes for privacy reasons, an organization will want to allow extension status monitoring but not allow connected caller monitoring for some extensions.
  • Granting Listen / Whisper / Barge access will allow a user to click on the name of an extension that they are monitoring and choose to begin listening to that user's phone conversation.
    • This feature is commonly used in sales and service teams by supervisors for training and quality control.
    • It is your responsibility to make certain that your employees have agreed to their calls being monitored.
    • If you would like this feature completely removed from your organization so not even an Admin can listen/whisper/barge, please open a support ticket.

Permission for Listen/Whisper/Barge must be granted by system administrators and works as follows:
Listen allows you to listen, without participating, to the conversation on a given extension.
Whisper allows you to participate in the conversation so that only the person at the selected extension is able to hear you. The external caller will not be able to hear you.
Barge allows you to fully participate in the conversation so that both participants in the call can hear you.

CALL FLOW CONTROL ACCESS


Call Flow Controls are set up by Intulse for your organization. Flow controls can be toggled between "Normal" and "Override" modes, which allows administrators to control the flow of calls coming into your organization. These are manually controlled, which is different from calendar driven time controls.

For example, an event on your calendar will tell a time control whether your organization is open or closed for the day. However, a flow control is manually toggled on and off, and can be used to override your time controls, allowing you to open or close your phone system outside of normally scheduled hours.
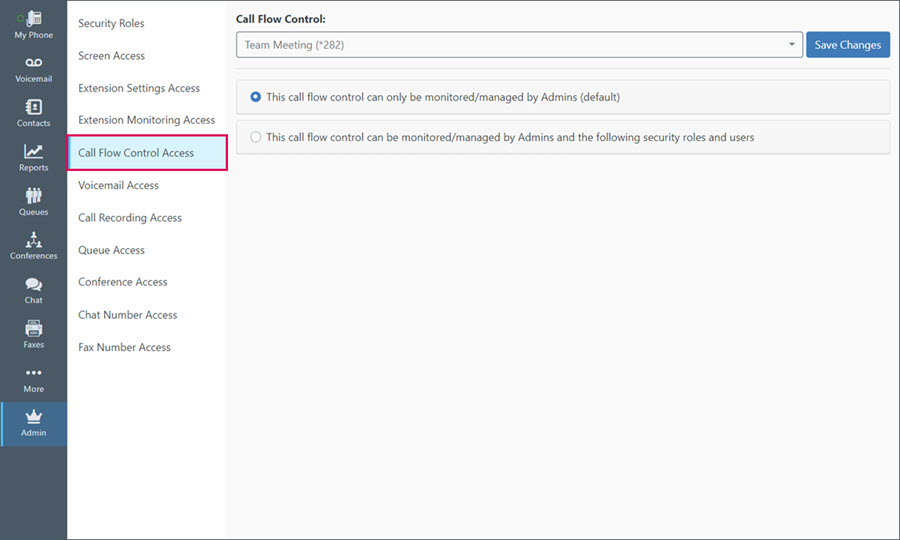
This screen allows you to set who can use Smart Monitoring to manage a call flow control.

  • By default only Admins can access a call flow control.
  • You can also assign permissions to specific users or security roles.
    • Add roles or users by clicking the green plus button beside any security role or user's name on the Excluded Roles/Users list as these are the people currently being excluded.
    • Remove roles or users by clicking the red x button beside any role or user's name on the Included Roles/Users list as these are the people currently being included.
    • Then click the blue Save Changes button.

VOICEMAIL ACCESS


This screen allows you set which users can manage each voicemail box on your system.
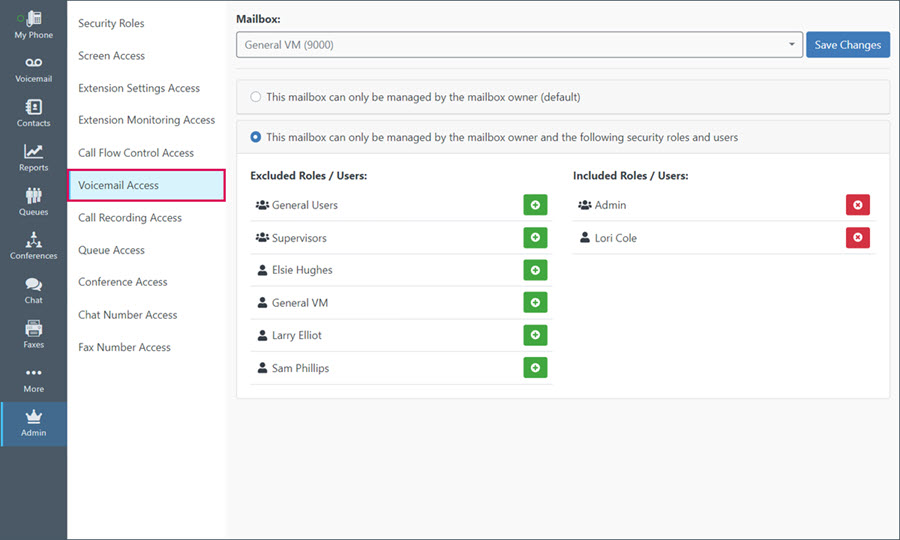
  • By default, voicemail boxes can only be managed by users attached to the extension for that voicemail box.
  • You can assign additional users or security roles permission to manage a voicemail box.
    • Add roles or users by clicking the green plus button beside any security role or user's name on the Excluded Roles/Users list as these are the people currently being excluded.
    • Remove roles or users by clicking the red x button beside any role or user's name on the Included Roles/Users list as these are the people currently being included.
    • Then click the blue Save Changes button.
  • You cannot remove permission for a voicemail box owner to manage their own voicemail.

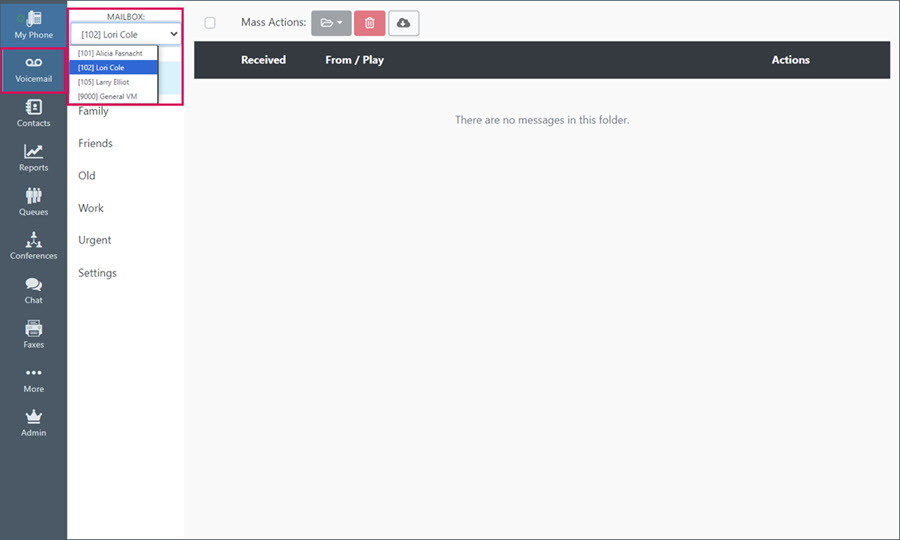
When a user has permission to manage more than one voicemail box, they will see a dropdown on the Voicemail menu that lets them choose which mailbox they are currently viewing.
CALL RECORDING ACCESS


If your organization records any calls either automatically or on-demand, the Call Recordings Report is where you can access those recordings. This screen allows you to control which users have access to calls recorded on specified extensions.
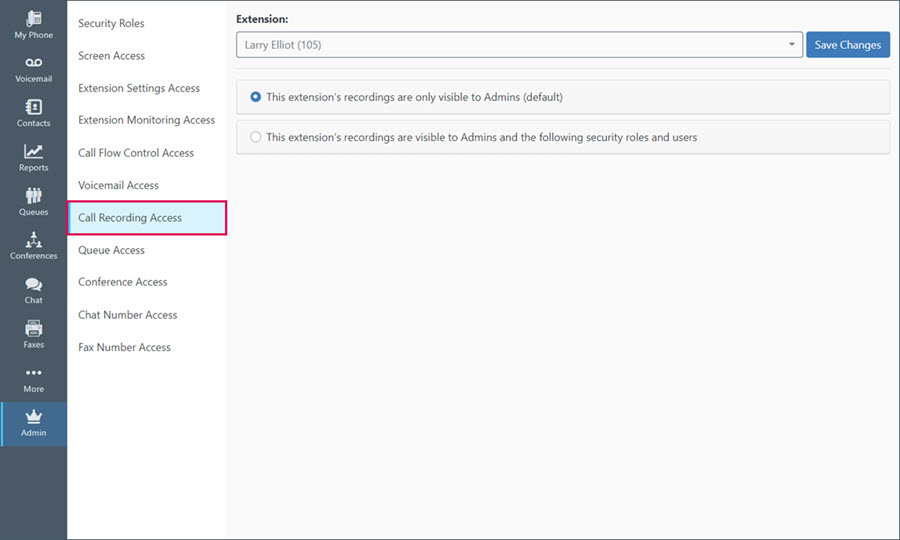
  • By default, call recordings are only visible to Admins.
  • You can assign additional users or security roles permission to access call recorded on specified extensions.
    • Add roles or users by clicking the green plus button beside any security role or user's name on the Excluded Roles/Users list as these are the people currently being excluded.
    • Remove roles or users by clicking the red x button beside any role or user's name on the Included Roles/Users list as these are the people currently being included.
    • Then click the blue Save Changes button.

QUEUE ACCESS


You can control which users can view and manage queues on the Queues screen.
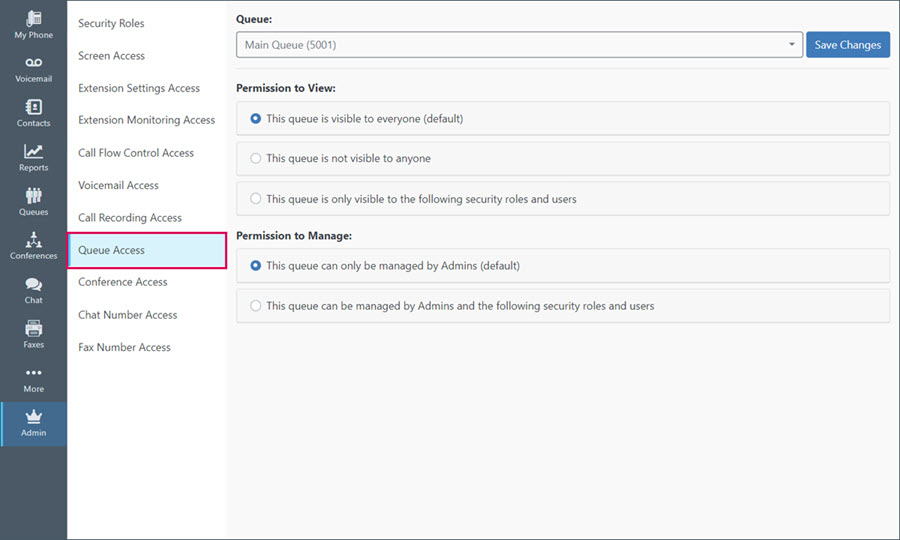
  • By default Queues are visible to everyone.
  • By default only Admins can manage Queues.

Permission to View

If a user can view a queue, they will be able to see agents who are currently servicing that queue, callers who are waiting in that queue, and some basic statistics for the queue. Any user that can view a queue can choose to "Login" to begin servicing that queue.

Permission to Manage

If a user can manage a queue, they will be able to do everything that comes with the permission to view the queue, but additionally they can do the following:

  • Logout any dynamic agents currently servicing the queue
    • Dynamic Agents are agents that log in/out of a queue
    • Static Agents are agents that are permanently logged into a queue
  • Login any user who has permission to view the queue
  • Pause/Unpause any agents currently servicing the queue
  • Transfer callers waiting in the queue to another destination

CONFERENCE ACCESS


You can control which users can view/manage Audio Bridges on the Conferences screen.
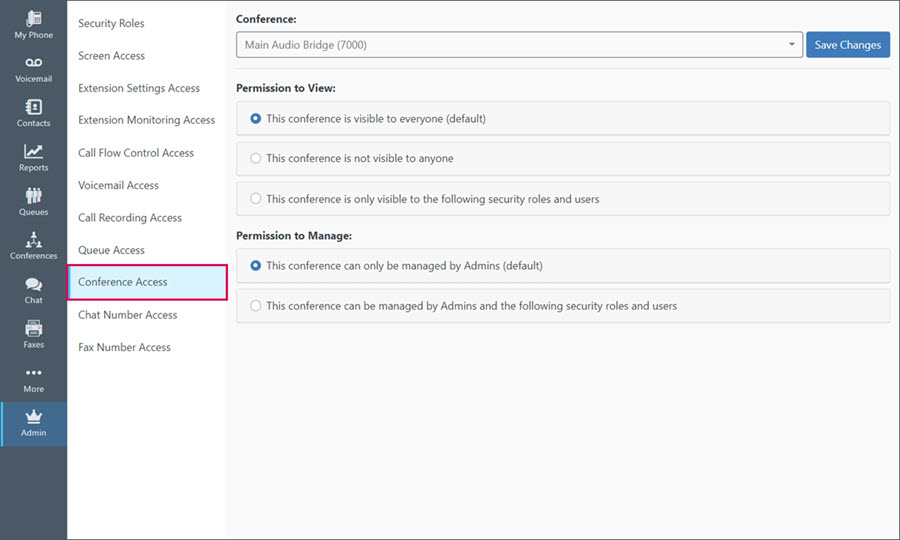
  • By default Audio Bridges are visible to everyone.
  • By default only Admins can manage Audio Bridges.

Permission to View

If a user can view Audio Bridges, they will be able to see participants currently in the conference and who is currently talking. They can mute and unmute themselves.

Permission to Manage

If a user can manage Audio Bridges, they will be able to do everything that comes with the permission to view the conference, but additionally they can do the following:

  • Change the behavior settings for the conference
    • For more information about the behavior settings, see Conferences.
  • Mute or unmute any participant in the conference
  • Kick participants from the conference

CHAT NUMBER ACCESS


You can control which users have the ability to see text message conversations being sent to/from each phone number assigned to your organization.
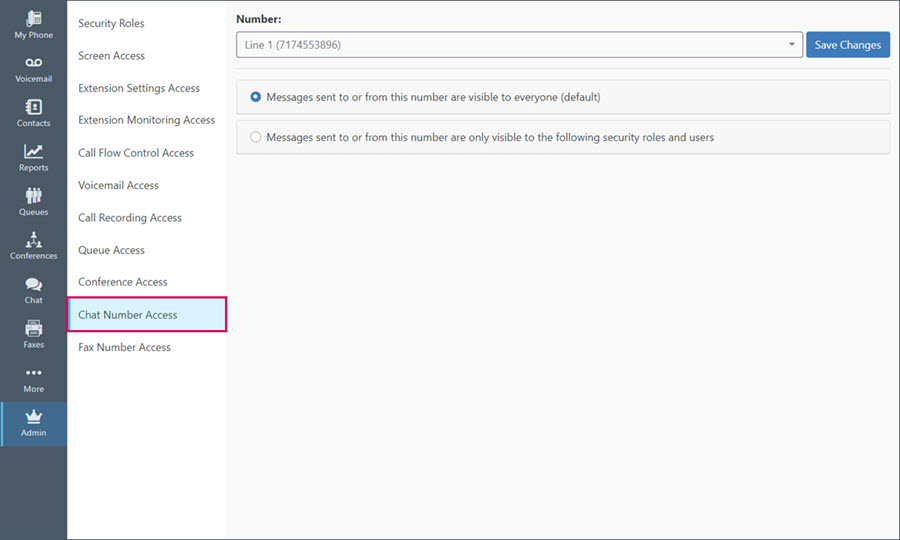
  • By default, everyone can view messages sent to or from a phone number. This means everyone will also be able to send and receive messages using that phone number.
  • You can "lock down" a phone number so that only specified users or security roles can send/view text messages using that number.
    • Add roles or users by clicking the green plus button beside any security role or user's name on the Excluded Roles/Users list as these are the people currently being excluded.
    • Remove roles or users by clicking the red x button beside any role or user's name on the Included Roles/Users list as these are the people currently being included.
    • Then click the blue Save Changes button.
  • This also affects which users will receive notifications about incoming text messages.

FAX NUMBER ACCESS


System administrators can control which users on your system have the ability to View and Send faxes for your organization.

By default, everyone within your organization has permission to both view and send faxes.
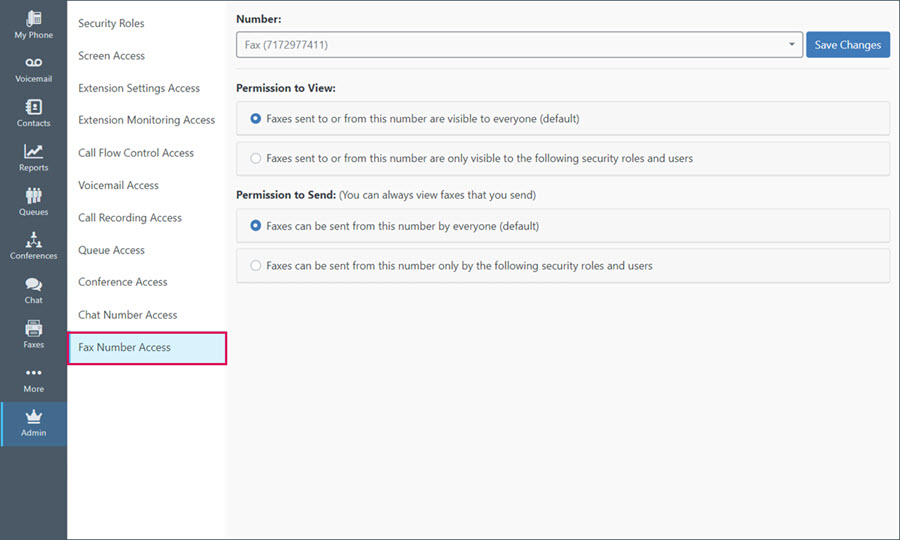
You can choose to separate which users can VIEW faxes and which users can SEND them. For example, you may have a user who should be able to SEND faxes from your number, but you do not want them to be able to VIEW any faxes that were sent or received by others within your organization. You can achieve this by setting the VIEW and SEND permissions accordingly.

  • Add roles or users by clicking the green plus button beside any security role or user's name on the Excluded Roles/Users list as these are the people currently being excluded.
  • Remove roles or users by clicking the red x button beside any role or user's name on the Included Roles/Users list as these are the people currently being included.
  • Then click the blue Save Changes button.
    • This also affects which users will receive notifications about faxes sent or received using that phone number.

Control which users receive email fax notifications in the Account Center. More information can be found in this Did You Know article.