Intulse Logo

MY PHONE


Welcome to the My Phone screen, one of the most important screens in the app! You will probably use this screen the most because it allows you to use any device as your Intulse phone. Let's spend some time making sure your settings are just the way you want them, and learning how to use your Virtual Phone. By the time you have worked your way through the information on this page, your My Phone screen will display the information you have selected to suit your individual needs.

To view My Phone click on it from the main menu. (On mobile devices, the menu is located at the bottom of your screen. It looks slightly different, but the functionality is the same.)

First let's take a few minutes to get your Virtual Phone set up.


VIRTUAL PHONE SETTINGS


The Virtual Phone Settings screen allows you to select the audio sources and ringtones pertaining to the Virtual Phone. You can access these settings by clicking on the gear icon in the Virtual Phone section.

Click here to view the "Virtual Phone Settings" portion of the video.

Selecting any audio device with the "Default" label means that your Virtual Phone will use whatever device your computer's operating system uses. If you change audio devices in your operating system, they will also be updated in your Virtual Phone settings. If you wish to select your phone's devices independently of your operating system, then avoid choosing the "Default" label. If you are using Incognito Mode or Guest Mode they may show as "Unknown."

Make sure you have selected the appropriate devices so you can hear the incoming caller and they can hear you.
Ringer Output determines which device will play the audio you hear when you are receiving a call.
Headset Output determines which device will play the audio you hear while on a call. 
Speaker Output determines which device will play the audio you hear when the speaker button is selected.
Microphone Input determines which device will be used for your voice while on a call. 

You can also select the sounds you hear when receiving or making a call. Default options have been set for you, or you can listen to and select other sounds using the drop-down menu.

The Incoming Ringtone determines the audio that is played when receiving a call.
The Call Waiting Tone determines the audio that is played when you are on a call and receive a new call.
The Outgoing Ringtone determines the audio that is played when making an outbound call.

Note: The Call Waiting Tone only applies if you have Call Waiting turned on for your extension.

If you Automatically enable the Virtual Phone, then the Virtual Phone will automatically be enabled whenever you load the app.

When you are satisfied with your selections be sure to Save these settings before navigating back to the My Phone screen.

ENABLE THE VIRTUAL PHONE


The Virtual Phone in the app allows you to use any device as your Intulse phone. When you toggle the button in the Virtual Phone section of the screen from Disabled to Enabled, your Virtual Phone is ready to go. You can make and receive calls from any device that has the Virtual Phone enabled.

Click here to view the "Enable the Virtual Phone" portion of the video.

You can flip this button back to "Disabled" any time you want to turn the phone off for that specific device. For example, you can toggle the button in your mobile app to "Enabled" at the beginning of your work day, and then back to "Disabled" when you are finished working for the day. This will only change the setting on your mobile device; leaving the app unchanged on any other devices.

You can have several Virtual Phones enabled at the same time. It is common to have the Virtual Phone active on a mobile device as well as a laptop/desktop.

You will notice a small status indicator beside the My Phone tab on the left menu screen. This allows you to monitor the status of your virtual phone while navigating other areas of the app. A green badge indicates that your virtual phone is enabled, while red indicates that your virtual phone is disabled.

EXTENSION SETTINGS


There are a few settings on the My Phone screen that allow you to control the calls coming to your phones. Turning them on will activate them for ALL enabled devices.

Click here to view the Extension Settings portion of the video.

Do Not Disturb stops calls from coming to your extension on ALL enabled devices, including your desk phone.
Call Waiting notifies you of an incoming call while you are on an active call. If you choose to decline the call, it will be sent to your voicemail unless you have Call Forward turned on.
Call Forward Always means your calls will always be forwarded to another extension or external number, which you will be prompted to enter when you turn it on. This is the option you should choose if you want your calls to be forwarded in any scenario. Calls will never reach the voicemail box associated with your extension when Call Forward Always is turned on.
Call Forward on Busy will only forward your calls to another number when you are on a call and Call Waiting is not enabled.
Call Forward on No Answer will only forward your calls to another number when you do not answer your extension and are not on a current call.

You can turn these on and off at any time, but remember they will affect each enabled device.

SET YOUR CUSTOM STATUS

You can create multiple custom statuses that will automate your virtual phone settings.

If you haven't yet created a custom status, click the link on the My Phone screen to set one. Select the option to Manage Statuses.

  1. Enter the name of your new status and click the Create button. This will allow you to select several additional settings.
  2. Enter your Status Text, which is what will show as your status to anyone who has selected to Smart Monitor your extension.
    • This can be left the same as the name of the status, or changed to be more specific.
    • If this field is blank, your Smart Monitoring status will show as either Available or Busy.
  3. Set your Availability as either available or busy. This will change the color of your text, but will not determine whether your phone is enabled or set to DND.
  4. Determine whether to Update Do Not Disturb,
    • Do Not Update means this will stay the same as the previously selected status.
    • Set to ON means your virtual phone will be on DND.
    • Set to OFF means your virtual phone will not be on DND.
  5. Determine whether to Update Call Waiting.
    • Do Not Update means this will stay the same as the previously selected status.
    • Set to ON means call waiting is turned on.
    • Set to OFF means call waiting is turned off.
  6. Determine whether to Update Call Forward Always.
    • Do Not Update means this will stay the same as the previously selected status.
    • Set to ON means your calls will always be forwarded.
    • Set to OFF means your calls will not be forwarded.
  7. Determine whether to Update Follow Me.
    • Do Not Update means this will stay the same as the previously selected status.
    • Set to ENABLED means Follow Me settings will be used.
    • Set to DISABLED means Follow Me settings will be ignored.
  8. Determine whether to Update Mute All Chat Notifications.
    • Do Not Update means this will stay the same as the previously selected status.
    • Set to ON means chats will be muted.
    • Set to OFF means chats will not be muted.

Once you have created multiple statuses, click on your profile picture to navigate between them to select your desired status or create a new one.

STARTING A CALL


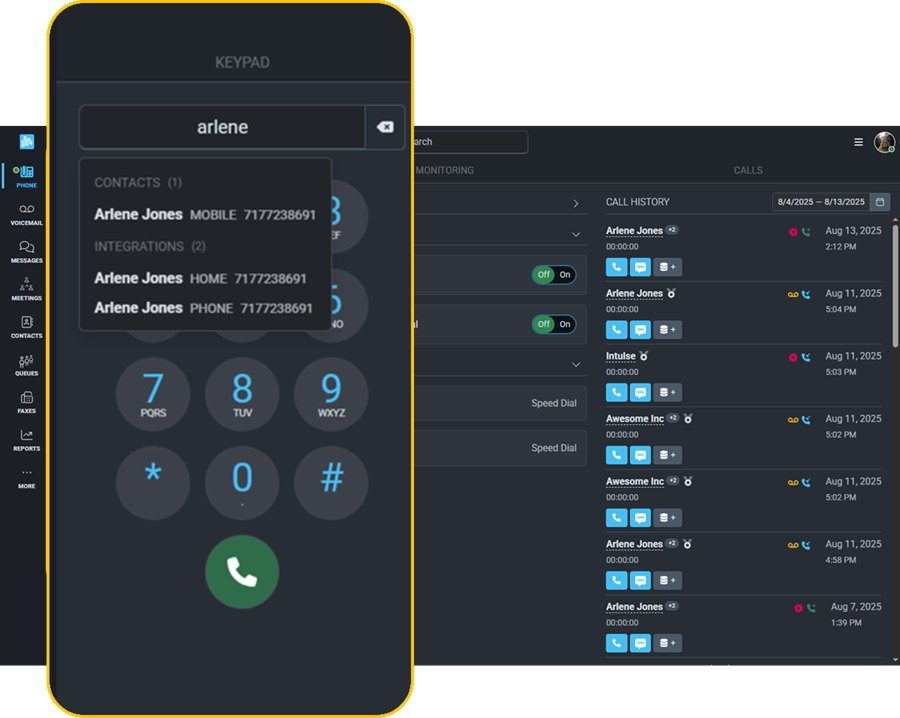
There are several ways to begin a call from your Virtual Phone:

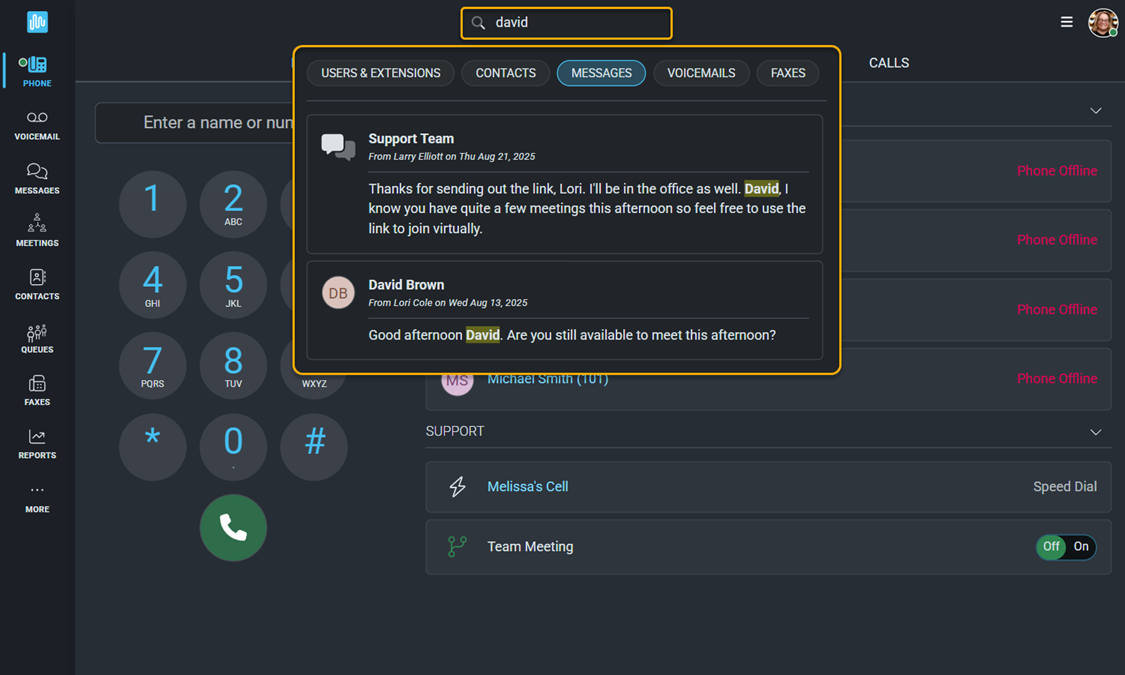
  • Search the Name of the person you wish to contact.
  • Type the Number of the person you wish to contact.
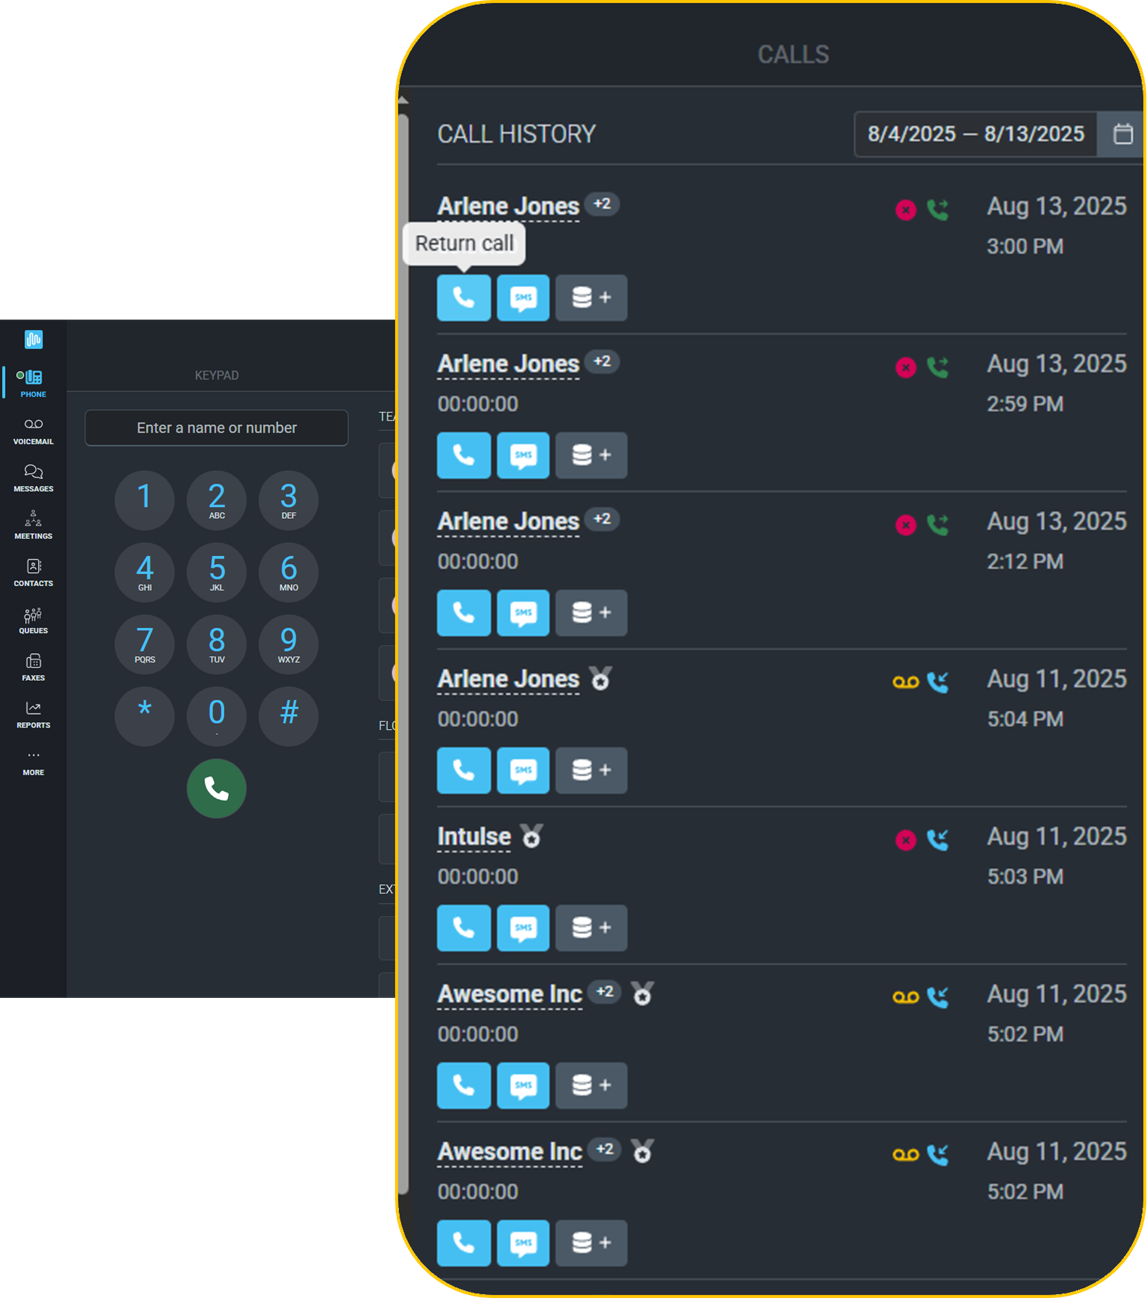
  • Click on the blue Call button found anywhere on the screen.
  • Click the Recent History button at the beginning of the search bar to see your 10 most recent calls.

Once you see the phone number to be dialed, click on the blue Phone button to begin the call.

Click here to view the Starting a Call portion of the video.

When you make a call from an enabled device, the call will begin directly from that device.

You can also make calls from a device that is disabled. In that case, the call will begin from all enabled devices, not from the disabled device. When you enter the name or number and click the call button, all of your enabled devices will ring. When you pick the call up on one of those devices, you will hear the outgoing ringtone because the system is in the process of calling the intended party.

RECEIVING A CALL


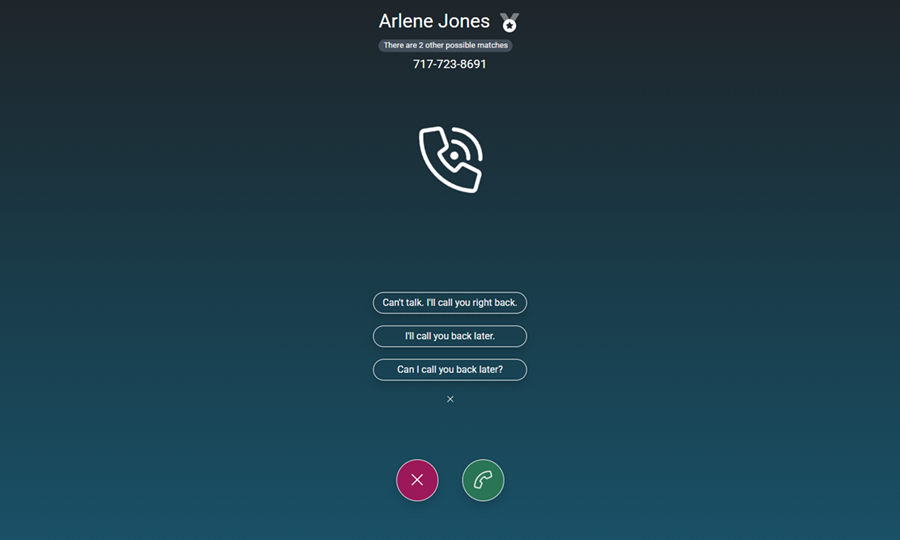
All enabled phones, including your desk phone, will ring when receiving an incoming call. These calls can be answered on any enabled device.

Click here to view the Receiving a Call portion of the video.

ON A CALL


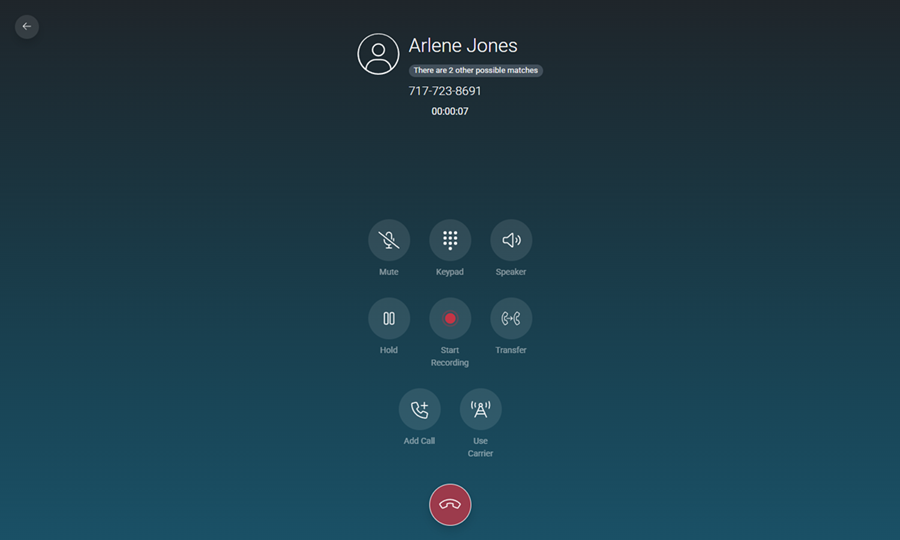
While on an active call, you have several options available to you. You can:

  • Mute your voice
  • Access the Keypad
  • Select the Speaker button
  • Place the call on Hold
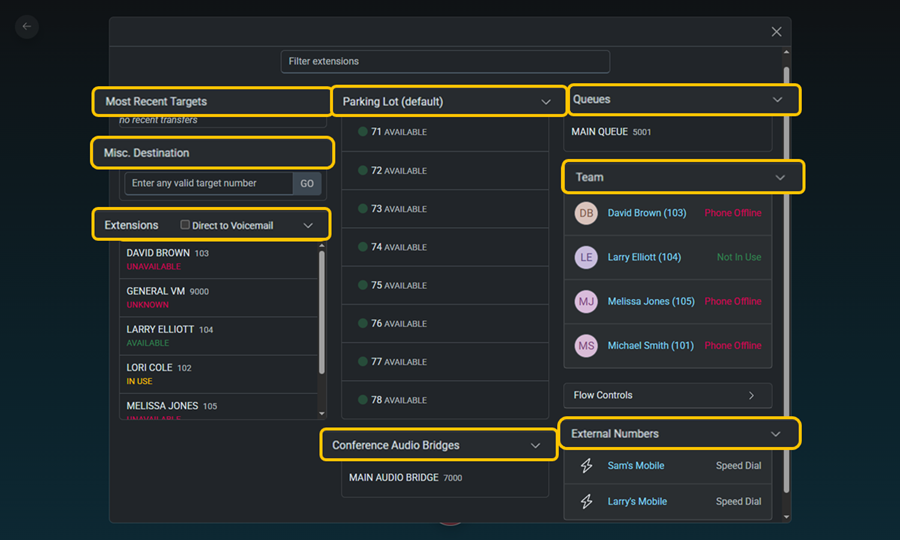
  • Transfer the call to another extension, an extension's voicemail box, an Audio Bridge, the Parking Lot, or a Queue.

Click here to view the On a Call portion of the video.

Calls that are placed on Hold can only be retrieved by the person who placed them on hold.

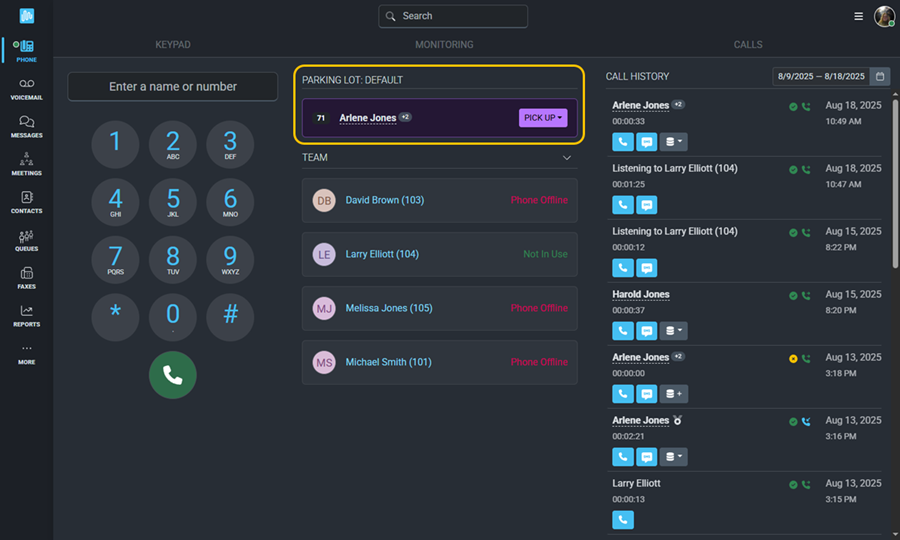
Calls that are sent to the Parking Lot can be picked up by anyone in the organization from any extension. For example, you can park a call and let a colleague know that there is a call parked for them, which they will then be able to pick up from any extension within the organization.

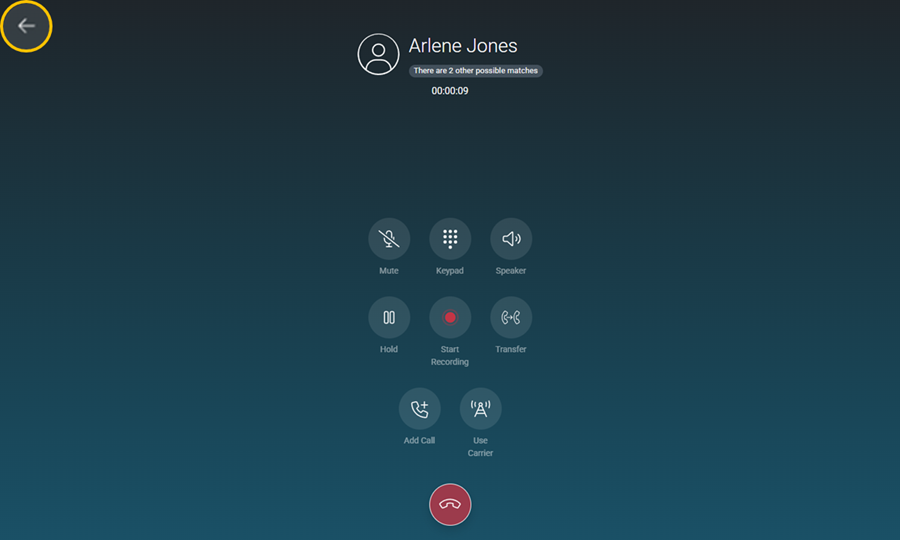
From the active call screen, you can click on the arrow in the top left corner to navigate to any other places in the app or to begin a second call.

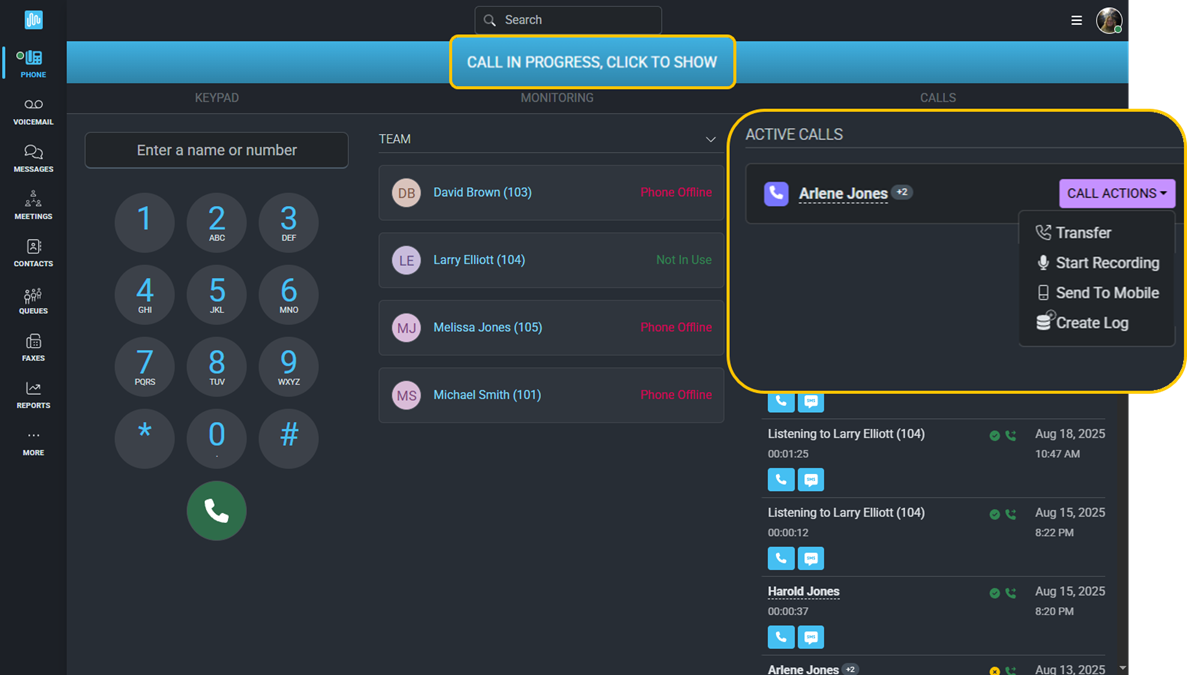
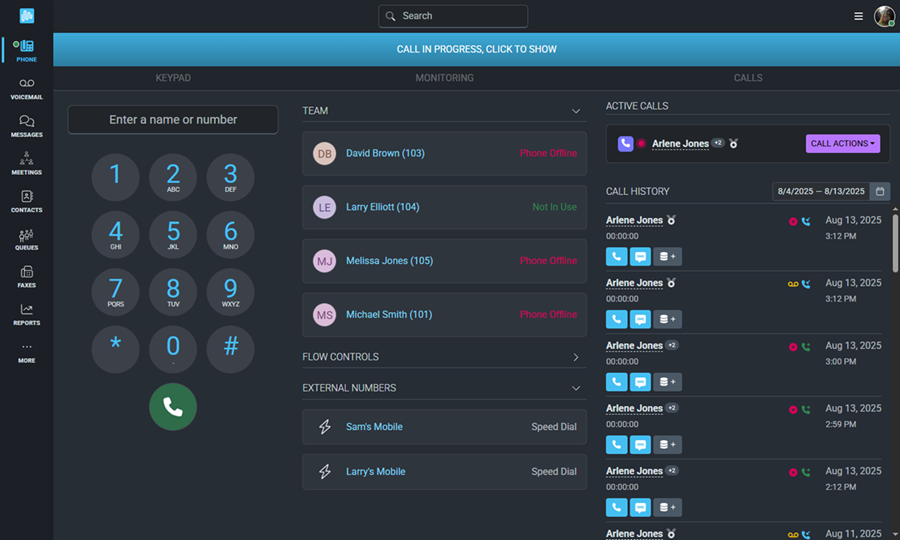
On the My Phone screen, you will be able to see any active calls, calls on hold, or calls placed in the parking lot.

The Call Actions button beside each call, including calls to your desk phone, allows you to transfer the call, record the call, forward the call to your personal cellular number, or create a log in your CRM if you have any integrations enabled.

From the My Phone screen, simply click the blue bar across the top to return to the active call screen.

CONFERENCE MULTIPLE CALLS


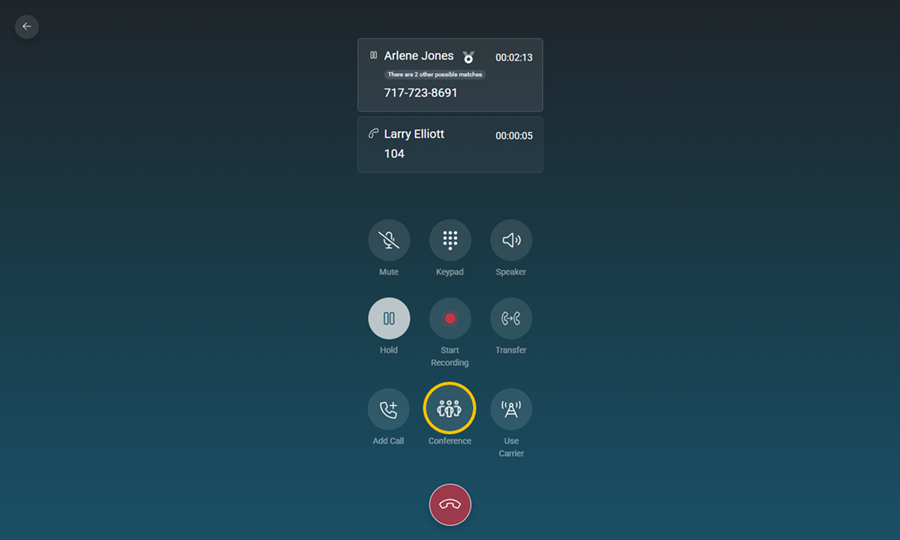
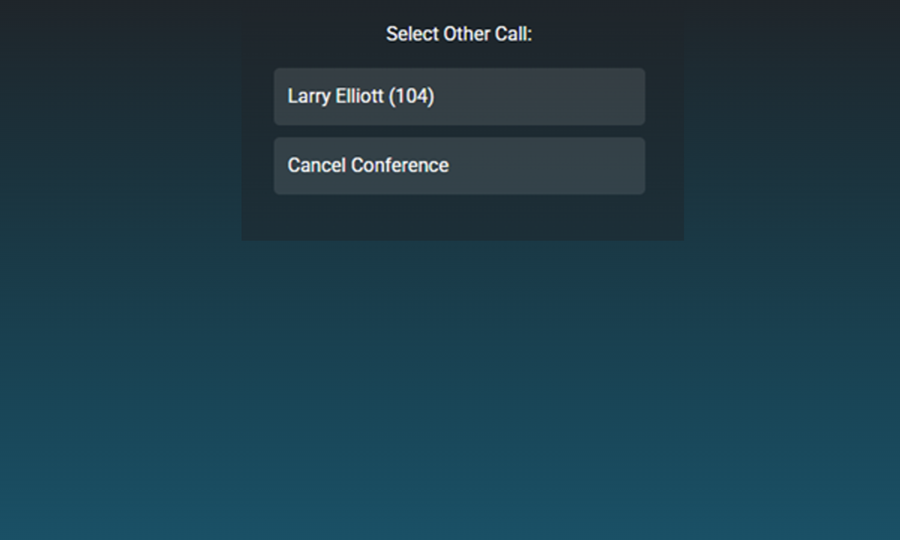
When you enter a new phone number in the Search or Dial field, the active caller will automatically be placed on hold while the new call is initiated. Once the second call connects, a Conference button will appear. Click that button and select the original call to merge both calls together.

Click here to view the Conference Multiple Calls portion of the video.

Although multiple calls can be conferenced this way, we recommend using an Audio Bridge for more than 3 callers.

When you're ready to end conference mode, click the Split button. All calls will return to individual call status.

SMART MONITORING SETUP


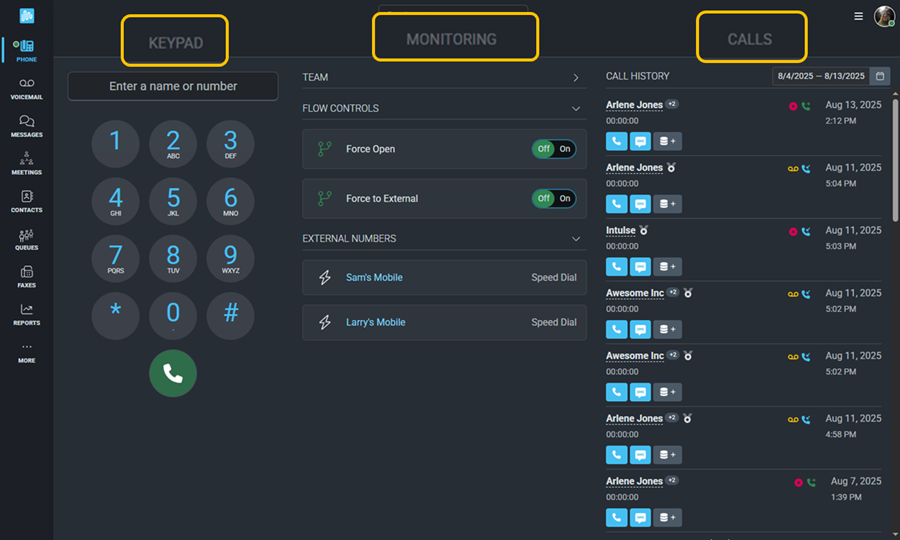
Smart Monitoring is what will allow you to personalize your My Phone screen based on your specific needs. This section of the page will explain each option available in Smart Monitoring, as well as how to set it up. The next section of the page will show you how to use each option.

Let's take a look at what Smart Monitoring is and how it will enhance your use of the Intulse phone system. Smart Monitoring allows you to create groups on your My Phone screen. These groups can include extensions, speed dials, flow controls, or busy lamp fields. Each of these items serves a different purpose so let's look at each one separately and talk about why you would use it, as well as how to set it up.

Click here to view the Smart Monitoring Setup portion of the video.

EXTENSIONS

Creating groups of Extensions will allow you to see each user’s current status, including whether their extension is available or busy and any custom status they may have created. If you have permission, you will be able to see who they are currently on the phone with. By clicking on the name of the extension, you will be presented with a list of options for interacting with that extension. The options available will vary based on permissions and extension type.

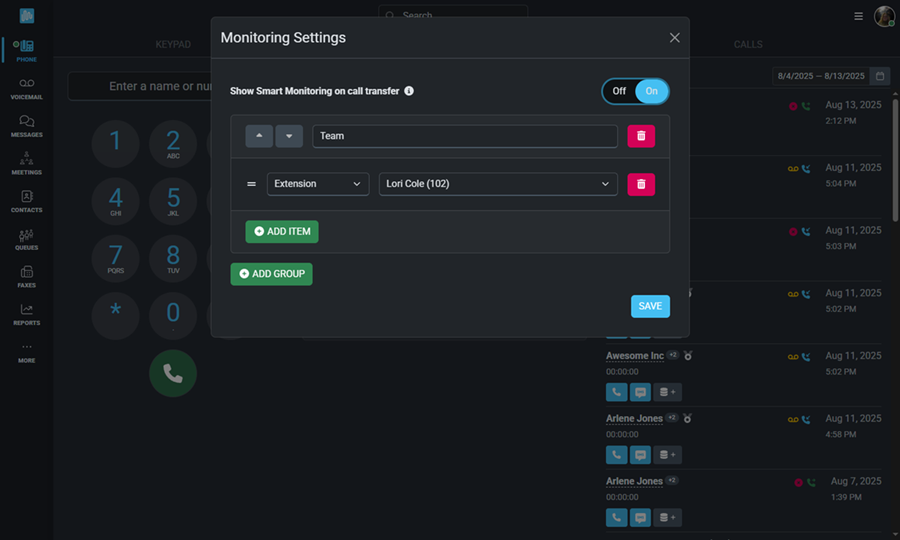
  • From the Configure Smart Monitoring screen, select Add Group and give that group a name. Then you will be given the option to Add Item to your group. Choose from the list of available extensions to add to your group. You can create multiple groups and add any number of items to each group.
  • For example, you could create a group specific to your team and add all of the team members available to you in the drop-down list. After you Save your selections, that group will be visible on your My Phone screen and you will be able to see each person's availability or click on their name to choose how you would like to interact with them.

SPEED DIALS

Creating Speed Dials will allow you to start a call with a single click.

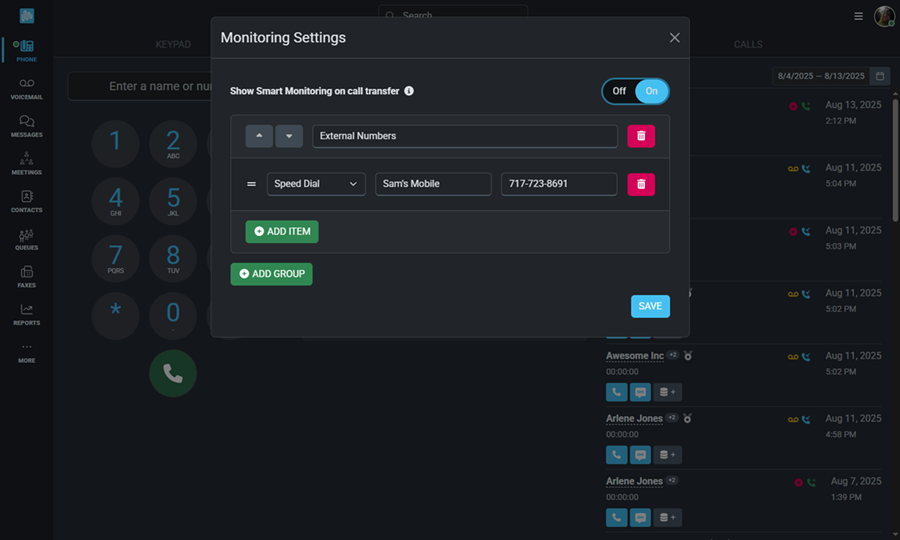
  • From the Configure Smart Monitoring screen, you can add speed dials to any group. Once you have created your group, just click on Add Item and select Speed Dial instead of Extension and then add the name and number for your speed dial contact. Once you Save your information, your speed dial contacts will show up in any group.

FLOW CONTROLS

Adding Flow Controls will allow you to override the normal flow of calls coming into your system by toggling them on.

  • Which flow controls exist for your organization is determined by your system administrator.
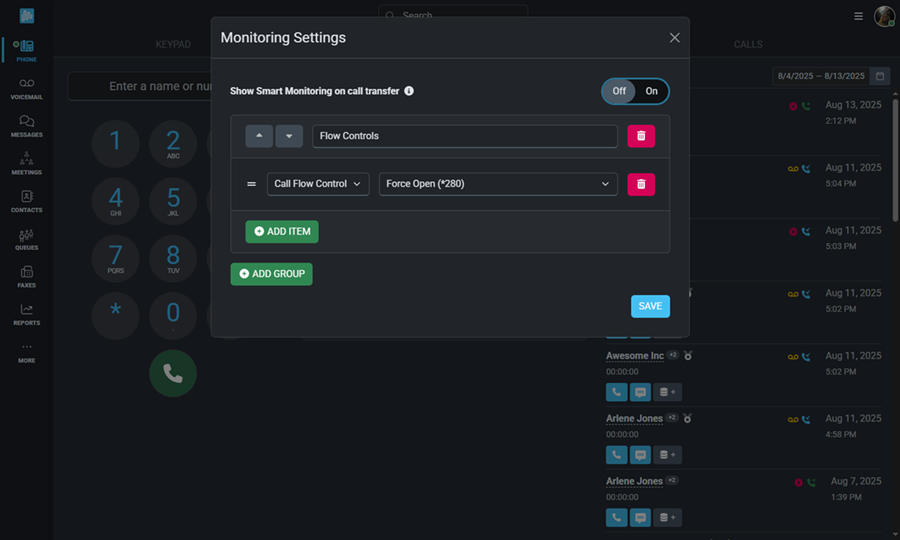
  • For example, your administrator may have flow controls set up for special holiday hours. You can add these controls to your My Phone screen, allowing you to toggle the button to the on position in order to send calls into a temporary override route. You would just toggle the button to off once you wish to have the system return to the normal call flow.
  • From the Configure Smart Monitoring screen, you can add flow controls to any group. Once you have created your group, just click on Add Item and select Call Flow Control from the list of options. Select the desired flow control from the list and Save your information to add it to your Smart Monitoring screen.

BUSY LAMP FIELDS

Adding Busy Lamp Fields, or BLFs, will allow you to monitor advanced features on your system.

  • For example, you could use a BLF to monitor a shared voicemail box so you are able to see when there are new messages waiting to be heard.
  • If you're interested in having these set up for you, contact Intulse support.

USING SMART MONITORING


Let's take a look at how to interact with the extensions, speed dials, flow controls, and any other Smart Monitoring features you may have set up on your My Phone page.

Click here to view the Using Smart Monitoring portion of the video.

EXTENSIONS

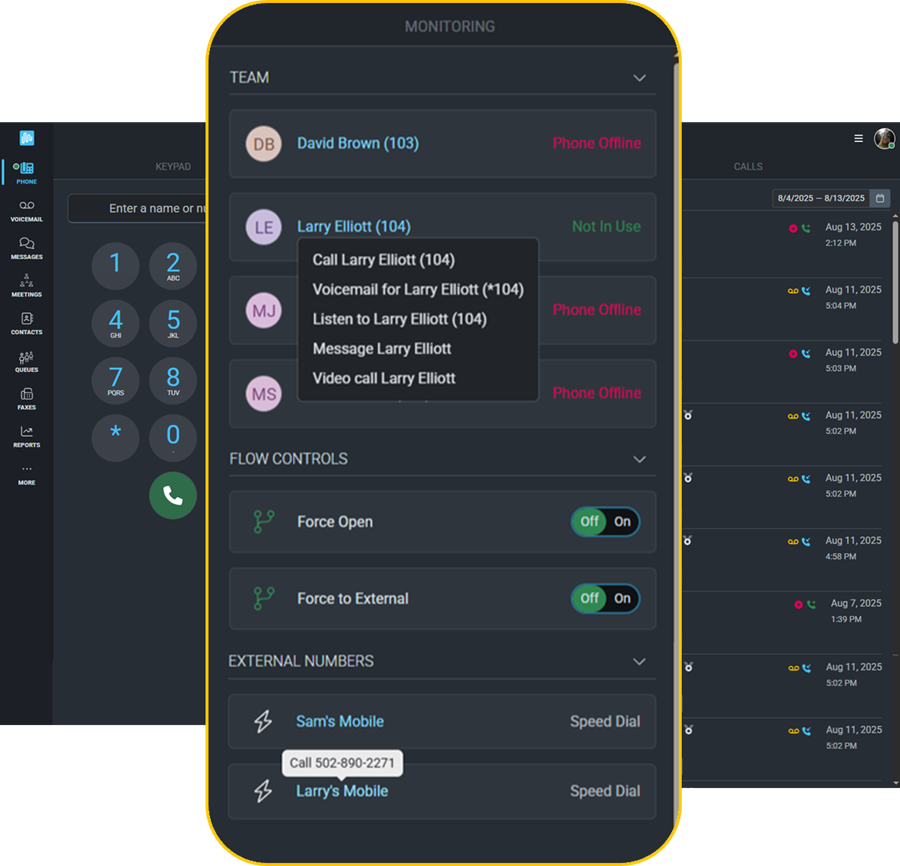
Creating groups of Extensions will allow you to see each user’s current status, meaning whether they are unavailable, available, in use, etc. If you have permission, you will be able to see who they are currently on the phone with. By clicking on the name of the extension, you will be presented with a list of options for interacting with that extension. The options will vary based on permissions and extension type.

  • Call Extension - Select this option to initiate a call to this extension.
  • Voicemail for Extension - Select this option to call this extension's voicemail.
  • Message Extension - Select this to send a direct message to the user at this extension.
  • Video Call Extension - If you have a license for Intulse Meetings, this option will initiate a video call with the user at this extension.
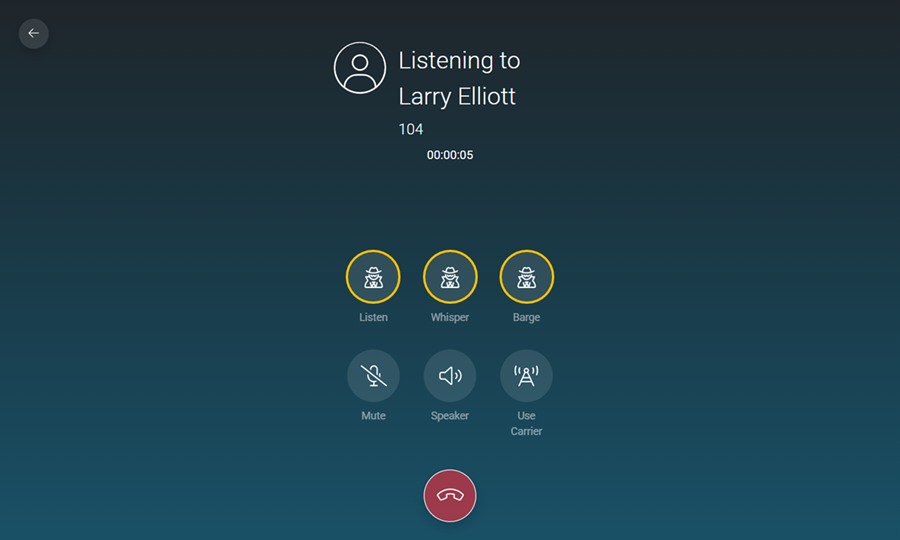
  • Listen to Extension - This option allows you to listen to this extension's conversation. If you select this option, you may also be presented with the option to whisper or barge.

Permission for Listen/Whisper/Barge must be granted by system administrators and works as follows:
Listen allows you to listen, without participating, to the conversation on a given extension.
Whisper allows you to participate in the conversation so that only the person at the selected extension is able to hear you. The external caller will not be able to hear you.
Barge allows you to fully participate in the conversation so that both participants in the call can hear you.

Permission to Listen, Whisper, Barge can either be granted by making someone an administrator in the Intulse App, or by going to the Admin tab in the app. Go to the Extension Monitoring Access tab and set permissions for specific extensions.

SPEED DIALS

Speed Dials allow you to start a call with a single click. Simply click on the name to initiate the call.

FLOW CONTROLS

Manage the flow of calls coming into your phone system. Flip the button to on and your calls will be sent into override mode until you turn the button off again.

FOLLOW ME


The Follow Me feature is helpful in a variety of circumstances.

Maybe you want your extension to ring, along with one or more assistants’ extensions. Or maybe you want a call to be forwarded to multiple people while you’re on vacation, but still return to your voicemail if no one else is able to answer it. Follow Me also allows you to receive calls using a cellular connection instead of relying on data services. And as a user on the Intulse system, you are able to adjust these settings for yourself at any time without needing to contact a system administrator.

You can create a list of phone numbers, including both extensions and external numbers such as mobile numbers, which the call will follow in an attempt to find you. This is called the Follow Me List.

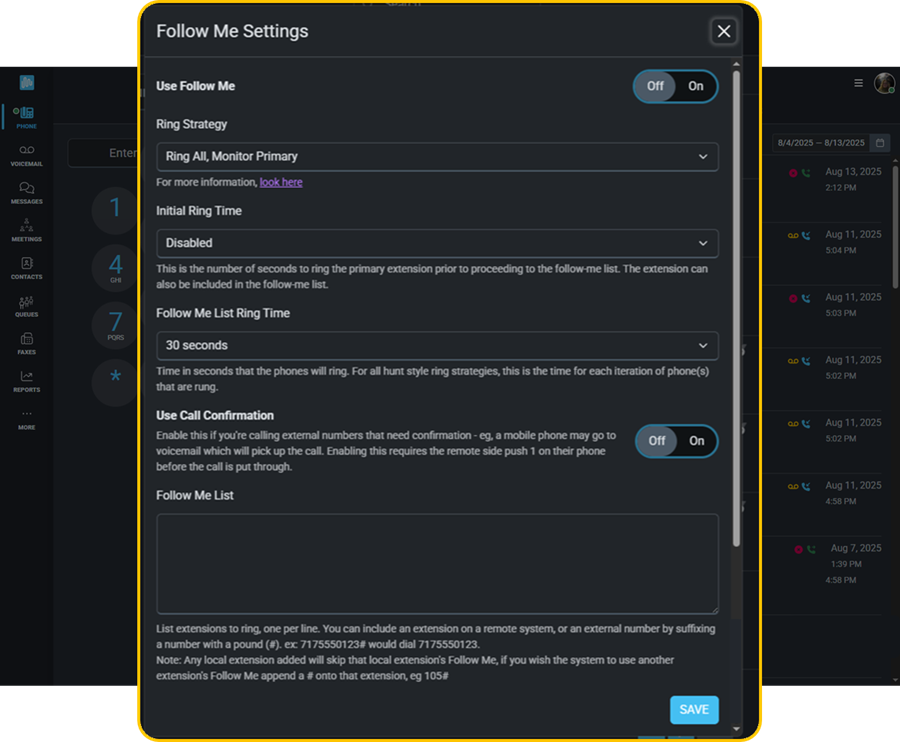
You will notice two different ring times in the Follow Me Settings.

  • Initial Ring Time refers to how long your extension will ring before moving on to the Follow Me List. If you want the call to go straight to the Follow Me List without calling your extension first, then you should select “Disabled” from this drop-down list.

  • Follow Me List Ring Time refers to how long each number on the Follow Me List will ring.

There are several different Follow Me Strategies available in the drop-down list, and they serve different purposes. Let's take a look at all of them to help you select the one that best fits your intended purpose.

  • When the Ring All strategy is selected, your extension will ring for the Initial Ring Time. If the call is not answered, all other numbers on the Follow Me List will ring simultaneously for the specified time. If your extension is the first number on the list, it will also continue to ring. This strategy is the correct choice for the purpose of getting anyone on your list to answer a call as quickly as possible.

  • When the Ring All, old strategy is selected, your extension will ring for the Initial Ring Time. If you do not answer the call, it is terminated and a new call is started to the Follow Me List. All numbers on that list will ring for the specified time.

  • When the Hunt strategy is selected, your extension will ring for the Initial Ring Time. If not answered, the first extension on the list will ring for the Follow Me List Ring Time. If the call is still not answered, the next extension on the list will ring and so on. This will continue until all numbers on the Follow Me List have been called. The Hunt style strategies are often the correct choice for the purpose of delivering a call you cannot answer to the MOST appropriate person rather than to everyone on your list all at once.

  • When the Hunt, additive strategy is selected, your extension will ring for the Initial Ring Time. If not answered, the first extension on the Follow Me List will ring. If the call is not answered, then the 1st and 2nd extension will ring, then the 1st, 2nd, and 3rd extensions, continuing to add a number each time until the call is answered or it reaches the end of the list.

  • When Monitor Primary is added to the Ring All or Hunt style strategies, they continue to work as previously described, but they pay attention to your extension’s settings first. If your extension is occupied or on Do Not Disturb, the call will go straight to your voicemail box. Also, this will cause any call forward settings for your extension to be ignored.

  • When the First Available strategy is selected, your extension will ring for the Initial Ring Time. If the call is not answered, only the first available extension on the Follow Me List will be rung. If the person at that extension is on the phone but has call waiting enabled, they are still available to take a call, so their extension will ring.

  • When the First Not on Phone strategy is selected, your extension will ring for the Initial Ring Time. If the call is not answered, only the first extension that is not on the phone will be rung. This means that if an extension on the list has call waiting enabled, but the person at that extension is on the phone, that extension will not be rung.

If the call is not answered by anyone on the Follow Me List, it will return to your voicemail box.

When the system is sending a call to an extension on your Follow Me List it will not use that extension’s Follow Me settings even if they are enabled, nor will it allow the call to go to their voicemail box. If you wish to change that behavior, add a pound sign to the end of the extension in your Follow Me List.

When adding external numbers to the Follow Me List, always add a pound sign to the end of the number.

We strongly recommend that you enable Call Confirmation if you are sending the call to external numbers. This feature alerts the external recipient to the fact that they are receiving a business-related call. It will require the recipient of the call to push 1 to accept the call. This feature also prevents calls from being answered by an external voicemail system such as the voicemail on a personal cell phone.