ONLINE MEETINGS
Intulse Meetings is a secure communication platform for hosting video and audio conferences such as calls, meetings, webinars, and demonstrations. It provides new ways to connect and collaborate directly within the Intulse App.
The Conferences screen shows all meetings you’ve scheduled or started and gives you the option to create new ones. From there, you can adjust meeting settings and invite participants. Only users with an Intulse Meetings License can start or schedule meetings. However, once a meeting is created, anyone with the meeting link and access (via lobby admission or password) can join.
☎️ VIDEO
START A MEETING
The Meetings screen lists all the meetings you've started or scheduled, as well as create new ones. From here, you can manage meeting options and invite attendees. Keep in mind, only users with an Intulse Meetings License can start or schedule meetings.
When starting a new meeting, you have two options:
- Meet Now - instantly start an impromptu meeting
- Schedule - set up a meeting in advance

To start an immediate meeting, select the meeting options, enter invite emails, and click Meet Now. Your meeting will initiate in a new tab; just click Join Meeting to begin.
To schedule a meeting for the future, select the meeting options, enter invitee emails, select the Start Date & Time, you can select an End Date & Time if you choose, and click the blue Schedule button. The meeting will now appear in your list of meetings on the left-hand sidebar.
- Meetings can be joined up to 30 minutes prior to the start time and 30 minutes after the end time. However, after those 30 minutes, the meeting will be inaccessible.
Once a meeting has been created, meeting options can be adjusted by selecting it from the sidebar in the app. Make any necessary changes and click Save. You can also Join or Delete meetings here. When you delete a meeting, it will be removed from your list and an email will be sent to each invited participant, informing them that it was cancelled.
Impromptu meetings can easily be started with other users on your system if you have a Meetings license.
- On the Phone screen, click on a user's name and select video call.
- On the Messages screen, in a Direct message, click the

- On the Messages screen, in a Channel, select Meet Now. A meeting link will immediately be added to the channel.
MEETING OPTIONS
There are several options that can be selected for each meeting.

- Make Meeting Permanent - When selected this allows you to create a custom URL that lasts until the meeting is deleted.
- Subject - Enter a subject to specify what the meeting is about and distinguish between multiple meeting links.
- Password - This locks the meeting so users must enter a password to join.
- Use Lobby - When set to on, participants' names are are sent to the moderator when joining. The moderator will need to admit each participant into the meeting when presented.
- If a Password has been set, participants will have the option of entering the password or joining via the lobby.
- Meetings must be locked, so either a Password must be entered, or Use Lobby must be turned on.
- Everyone Starts Muted - When set to on, all participants' microphones are muted when they first join the meeting.
- Everyone Starts Hidden - When set to on, all participants' cameras are turned off when they first join the meeting.
- Everyone Follows Me - When turned on, participants will follow the focus of the moderator. This means if the moderator selects a particular user's thumbnail to view, all participants will view the same feed the moderator is viewing.
INVITE PARTICIPANTS
Participants are invited to a meeting via email.

- Invite Notifications - When set to on, you will receive an email notifying you when a participant responds to their invitation.
- Invites - Enter the email address(es) for any attendees, then click Add.
- Once you click Meet Now or Schedule, each invitee will receive an email with the link to join the meeting. Meeting invites will include the name of your organization in the subject line and body of the email as well as in the calendar event.
- Invites will also include the option to add the meeting to their calendar.
- Additional participants can be invited once the meeting has begun.
- Click the red trashcan next to a participant's email to remove them.
- The yellow badge beside a participant will change to green once the invite is sent.
- Invites: Select Members - You can select from a list of internal users to add as either a Moderator or Attendee.
- If you add a user as a Moderator, they will be able to manage the meeting, but only the owner/creator will be able to delete the meeting.
Click HERE to see what a participant will experience when Joining a Meeting.
MANAGE A MEETING
Your entire meeting can be managed within the Intulse Meetings screen. Let's take a look at the settings available to you on this screen.

There is a meeting banner along the top of the screen with some clickable buttons.
- The blue Invite button opens a screen allowing you to invite additional participants.
- The Keyboard button displays a list of keyboard shortcuts.
Moving your mouse around a meeting will cause some additional tools to appear.
- Above your profile image, you will see the subject of the meeting, a timer counting the length of the meeting, and a button allowing you to manage the performance settings.
- The toolbar containing all of the options available to you during the meeting.
TOOLBAR
Let's take a look at each item available on the toolbar.
The microphone icon allows you to mute or unmute your mic throughout the meeting. Click the up arrow beside the microphone to select which microphone and speaker you will use during the meeting. Press and hold the spacebar to speak temporarily, or press M to mute/unmute your microphone.
The camera icon allows you to start or stop your camera throughout the meeting. Click the up arrow beside the camera to see a preview of your video when enabled. You can also select a virtual background or turn video mirroring on/off here. Press V to start/stop your camera.
The screen arrow icon allows you to start or stop screen sharing. Click this button to open a window which asks you to choose whether to share a specific tab, a window, or your entire screen with all participants. There is a checkbox allowing you to choose whether to share your system audio as well. Press D to open the screen sharing window.
The dialogue bubble icon opens a chat sidebar on the left side of the screen. This sidebar has two tabs: Chat and Polls. A number badge next to this icon indicates the number of unread messages or polls. Press C to open the chat sidebar.
- In the Chat tab, you will see any messages sent by other participants, along with a response field.
- In the Polls tab, you will see all polls submitted by participants. You can vote in these polls, or click the blue button to Create a poll of your own. Once you submit your vote, you will be shown the results and votes of other participants. You an also change your own vote.

The hand icon illustrates "raising your hand" and lets other participants know that you would like to speak. A badge is added to your thumbnail until you "lower your hand" by clicking the hand icon button again. You can also press R to raise or lower your hand.
- Clicking the up arrow beside the hand icon gives you six reactions to choose from. When you click a reaction, it will show on other participants' screens and in the chat thread.

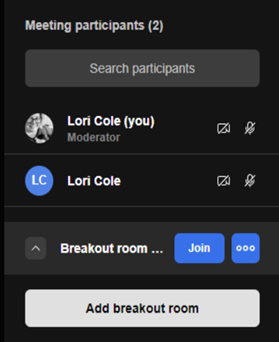
The people icon opens a "Meeting Participants" sidebar on the right side of the screen. This sidebar includes a searchable list of participants. Press P to open the participants sidebar.
- Hovering over a participant's name will cause a button with three dots to appear. Clicking on this button will present a list of options for interacting with this person. Click HERE to learn more about these options.
- You can also Add Breakout Rooms on this sidebar. Once the room is created, it can be renamed and participants can be added.
- Participants can also be moved back into the main meeting room from a breakout room.
The tiles icon toggles tile view on or off. When tile view is toggled on, you will see all participants on the main screen. If their camera is enabled, you will see their video feed, or you will see their gravatar image if their camera is not enabled. Click a user's thumbnail to center them on the screen. Press W to toggle tile view on/off.
The ellipsis icon opens a menu with more features and settings.
- Performance Settings opens a slider allowing you to control your personal performance for the meeting. Setting the slider to Best Performance turns off your video to conserve bandwidth. Moving the slider to Highest Quality attempts to display the highest quality video streams.
- View Full Screen changes the view so the meeting takes up your entire monitor.
- Security Options allow moderators to change the meeting password and/or enable or disable the lobby. Meetings are required to have either a password or lobby enabled at all times.
- Start Recording opens a window allowing you to record the meeting. At the end of the meeting, the recording will stop and download to your browser.
- Share Video opens a window allowing you to add a YouTube or other video link.
- Share Audio opens a window allowing you to choose whether to share the audio for a specific tab or for your entire screen.
- Noise Suppression will reduce unwanted background noise.
- Show Whiteboard ... coming soon!
- Select Background lets you choose a background for your camera.
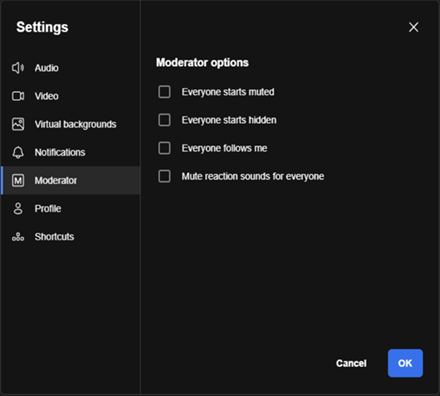
- Settings opens the user settings for the meeting. These are the same settings that were covered on the Join a Meeting page, with the addition of Moderator Settings which allow the moderator to manage a few settings for all participants.
- If Everyone starts muted is enabled, all participants will join with their microphones muted regardless of their individual settings.
- If Everyone starts hidden is enabled, all participants will join with their cameras turned off regardless of their individual settings.
- If Everyone follows me is enabled, participants’ views will follow the view of the moderator. This means that if the moderator clicks on a particular thumbnail, all users will zoom in on that participant's video feed.
- Mute reaction sounds for everyone will silence any notification sounds regardless of a participant's individual settings.
- Shortcuts opens the list of keyboard shortcuts that can be used during a meeting.
END A MEETING
End your meeting by clicking on the red phone button on the toolbar. When you click this button, you will see that you have the options to End Meeting for All or Leave Meeting. If you select Leave Meeting, other participants will be able to remain in the meeting until they choose to leave.
If you are the last remaining participant and you do not choose to leave the meeting, you will receive a prompt asking if you would like to end the meeting. If you do not respond, it will automatically close after 30 seconds.


