Intulse Logo

MEETING TOOLBAR


Your entire meeting can be managed within the Intulse Meetings screen. Let's take a look at the settings available to you on this screen.

MEETING BANNER

There is a meeting banner along the top of the screen with some clickable buttons.

  • The blue Invite button opens a screen allowing you to invite additional participants.
    • If a participant needs to have their invitation resent, you will need to use the Remind option in the Intulse App.
  • The Keyboard button displays a list of keyboard shortcuts.

Moving your mouse around a meeting will cause some additional tools to appear.

  1. Above your profile image, you will see the subject of the meeting, a timer counting the length of the meeting, and an icon showing the number of participants in this meeting.
  2. The toolbar containing all of the options available to you during the meeting.

TOOLBAR

Let's take a look at each item available on the toolbar.

mic

The microphone icon allows you to mute or unmute your mic throughout the meeting. Click the up arrow beside the microphone to select which microphone and speaker you will use during the meeting. Press and hold the spacebar to speak temporarily, or press M to mute/unmute your microphone.


The camera icon allows you to start or stop your camera throughout the meeting. Click the up arrow beside the camera to see a preview of your video when enabled. You can also select a virtual background or turn video mirroring on/off here. Press V to start/stop your camera.


The screen arrow icon allows you to start or stop screen sharing. Click this button to open a window which asks you to choose whether to share a specific tab, a window, or your entire screen with all participants. There is a checkbox allowing you to choose whether to share your system audio as well. Press D to open the screen sharing window.


The dialogue bubble icon opens a chat sidebar on the left side of the screen. This sidebar has two tabs: Chat and Pools. A number badge next to this icon indicates the number of unread messages or polls. Press C to open the chat sidebar.

  • In the Chat tab, you will see any messages sent by other participants, along with a response field.
  • In the Polls tab, you will see all polls submitted by participants. You can vote in these polls, or click the blue button to Create a poll of your own. Once you submit your vote, you will be shown the results and votes of other participants. You an also change your own vote.


The hand icon illustrates "raising your hand" and lets other participants know that you would like to speak. A badge is added to your thumbnail until you "lower your hand" by clicking the hand icon button again. You can also press R to raise or lower your hand.

  • Clicking the up arrow beside the hand icon gives you six reactions to choose from. When you click a reaction, it will show on other participants' screens and in the chat thread.


The people icon opens a "Meeting Participants" sidebar on the right side of the screen. This sidebar includes a searchable list of participants. Press P to open the participants sidebar.
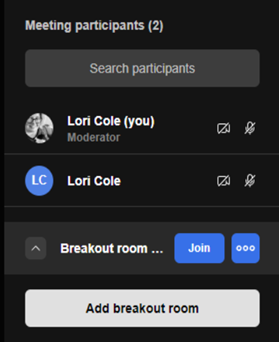
  • Hovering over a participant's name will cause a button with three dots to appear. Clicking on this button will present a list of options for interacting with this person. The next page will cover these options in detail.
  • You can also Add Breakout Rooms on this sidebar. Once the room is created, it can be renamed and participants can be added.
    • Participants can also be moved back into the main meeting room from a breakout room.


The tiles icon toggles tile view on or off. When tile view is toggled on, you will see all participants on the main screen. If their camera is enabled, you will see their video feed, or you will see their gravatar image if their camera is not enabled. Click a user's thumbnail to center them on the screen. Press W to toggle tile view on/off.


The ellipsis icon opens a menu with more features and settings.
  • Performance Settings opens a slider allowing you to control your personal performance for the meeting. Setting the slider to Best Performance turns off your video to conserve bandwidth. Moving the slider to Highest Quality attempts to display the highest quality video streams.
  • View Full Screen changes the view so the meeting takes up your entire monitor.
  • Security Options allow moderators to change the meeting password and/or enable or disable the lobby. Meetings are required to have either a password or lobby enabled at all times.
  • Start Recording opens a window allowing you to record the meeting. At the end of the meeting, the recording will stop and download to your browser.
  • Share Video opens a window allowing you to add a YouTube or other video link.
  • Share Audio opens a window allowing you to choose whether to share the audio for a specific tab or for your entire screen.
  • Noise Suppression will reduce unwanted background noise.
  • Show Whiteboard ... coming soon!
  • Select Background lets you choose a background for your camera.
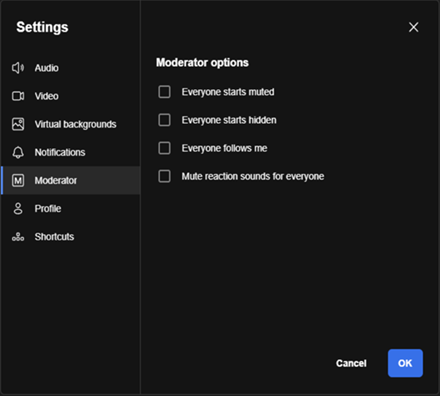
  • Settings opens the user settings for the meeting. These are the same settings that were covered on the Join a Meeting page, with the addition of Moderator Settings which allow the moderator to manage a few settings for all participants.
    • If Everyone starts muted is enabled, all participants will join with their microphones muted regardless of their individual settings.
    • If Everyone starts hidden is enabled, all participants will join with their cameras turned off regardless of their individual settings.
    • If Everyone follows me is enabled, participants’ views will follow the view of the moderator. This means that if the moderator clicks on a particular thumbnail, all users will zoom in on that participant's video feed.
    • Mute reaction sounds for everyone will silence any notification sounds regardless of a participant's individual settings.

  • Shortcuts opens the list of keyboard shortcuts that can be used during a meeting.

Continue to the next page to find out how to manage and interact with participants in your meeting.