QUEUE DETAILS
The Queue Details tab will allow you to manage the settings for the selected queue.
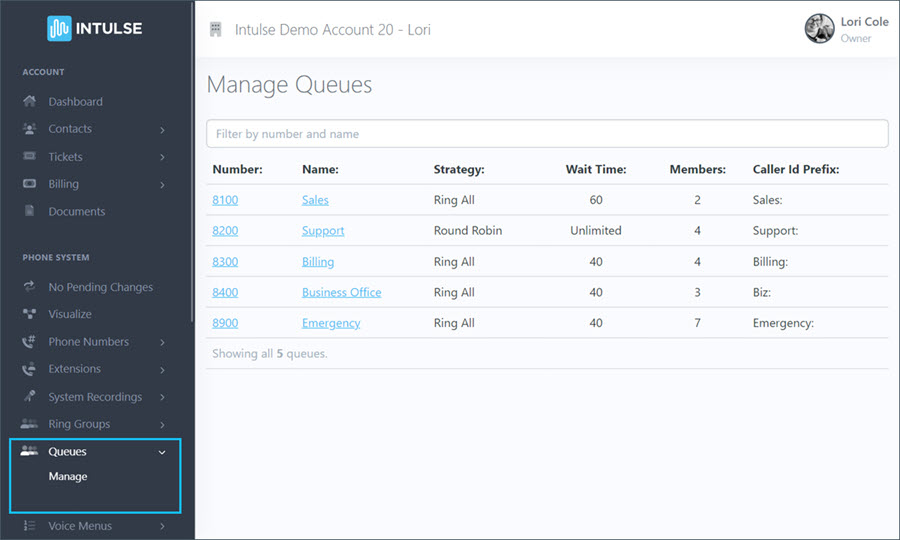
BASIC SETTINGS
You are able to edit the following basic settings for each queue.
- Give your queue a Name that will allow you to easily identify its purpose.
- You have the option of entering a Caller ID Prefix that will be added onto the caller ID name when a call is presented to the agents in this queue. For example, a call which enters the queue with a caller ID of "John Doe" could be changed to something like "Support: John Doe" to help support team members know that it's a direct or forwarded call to the support queue.
- Select the Strategy for the way calls are distributed to queue agents. These strategies are explained below.
- Determine What callers hear while waiting for the call to be answered. You can choose to have them hear
- Music Only - If you select this option, you can choose between inherited music that you have selected previously in your system settings, or the default music.
- Ringing Only
- A combination of Music and Ringing, meaning the caller would hear music while all agents are busy, and ringing once an agent is available and the call is being presented to that agent.
- Decide whether to Record Calls. If there aren't other call recording settings already in place for the call flow, you can set them for a specific queue. Record call options are:
- Force means call recording cannot be turned off.
- Yes means call recording is on until the settings in another phone system feature are set to not record.
- On Demand means call recording is off by default, but can be turned on.
- No means call recording is off until the settings in another phone system feature are set to record.
- Never means calls cannot be recorded.
- Mark Calls Answered Elsewhere will inform the phones of other agents that a call has been answered by an agent in the queue. Missed calls will not be shown if this is selected.
- How long callers can wait determines the maximum number of seconds a caller can wait in a queue before being sent to the failover destination.
- Select the Failover Destination which determines what happens to a call if it is not answered by anyone on the team. There are several options within this dropdown menu.
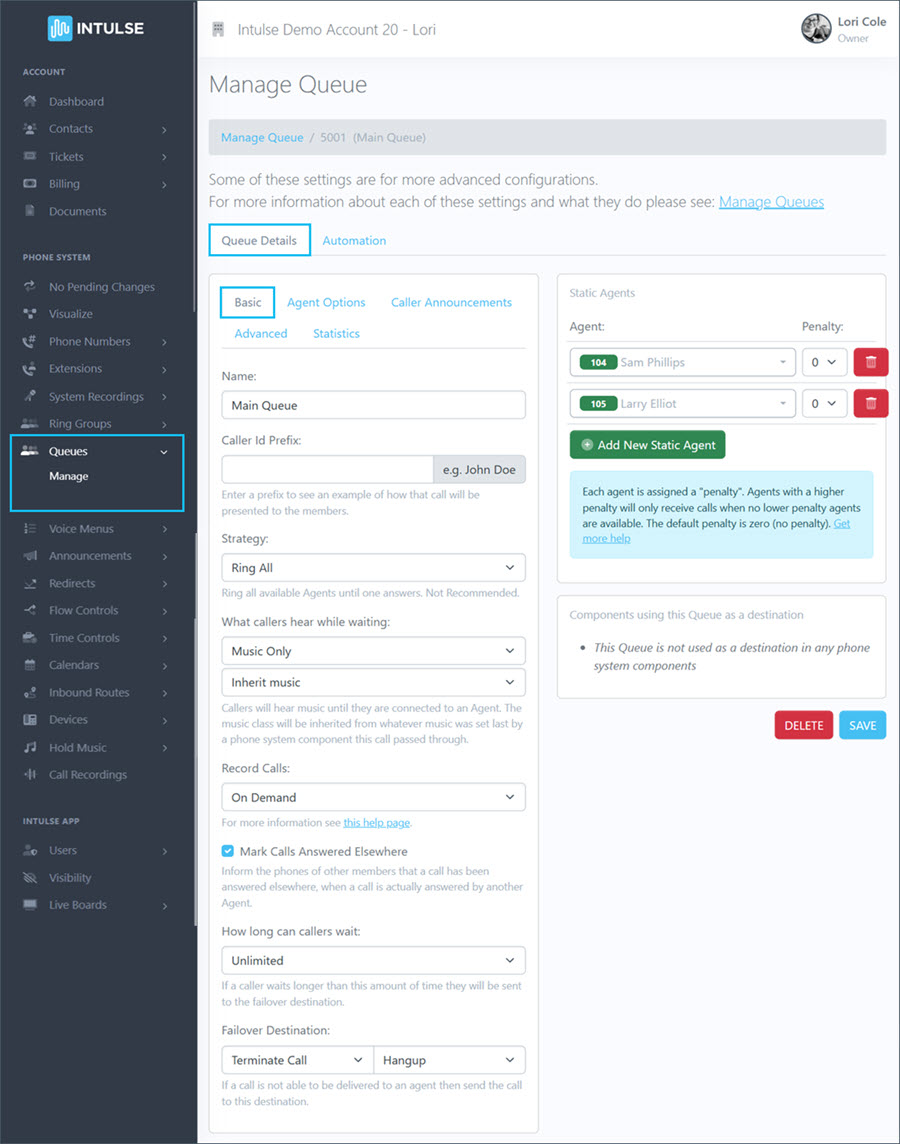
There are several Strategies the system can use to present a call to agents in the queue.
- Least Recent - Presents a call to the agent who least recently answered a call from this queue.
- Fewest Calls - Presents a call to the agent who has answered the fewest calls from this queue.
- Round Robin - Presents a call to agents in a sequential fashion, starting with a different agent each time. This strategy will pick up where it last left off.
- Round Robin, ordered - Presents a call to agents in a sequential fashion, starting with the first agent in the list each time.
- Linear - Presents a call to agents in the order they joined the queue, starting with the same agent each time. This is most useful with static agents.
- Random - Makes a call hop between the agents without a pre-defined priority to ensure that calls to this queue are (almost) evenly spread.
- Random, weighted - Makes a call hop between the agents without a pre-defined priority to ensure that calls to this queue are (almost) evenly spread. Uses agents penalty as a weighting factor.
- Ring All - Ring all available agents until one answers.
STATIC AGENTS
Static agents are the agents who will always be presented with calls from the queue. Depending on the call strategy selected, the order of the agents will be considered. Each agent is also assigned a "penalty", which will determine how calls are prioritized.
- Select extensions from the drop-down list to add agents to the queue. Assign each agent a penalty.
- The default penalty is zero. These agents will receive calls first. Agents with a higher penalty will only receive calls when no lower penalty agents are available.
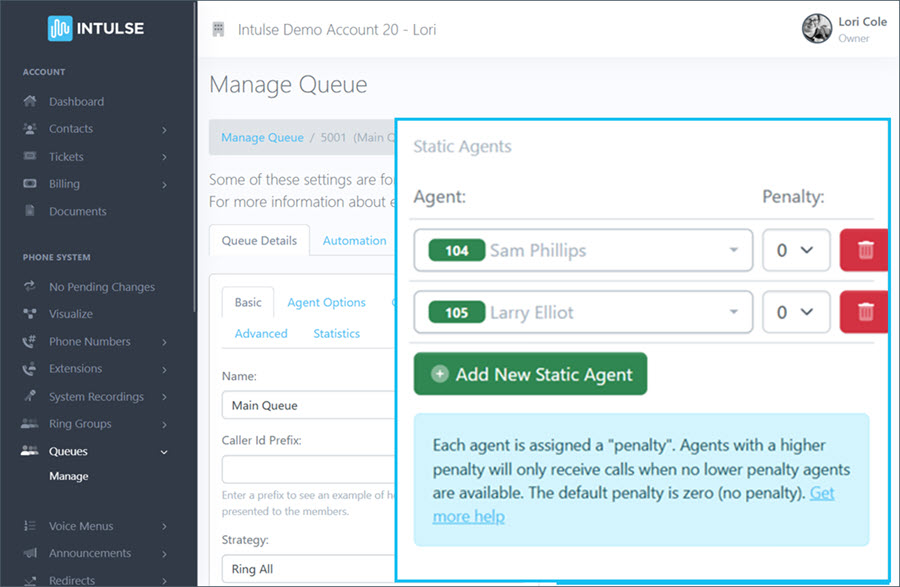
You will also see a message below the Static Agents field alerting you to where this queue is being utilized in your current call flow.
AGENT OPTIONS
These settings apply to each agent within the queue.
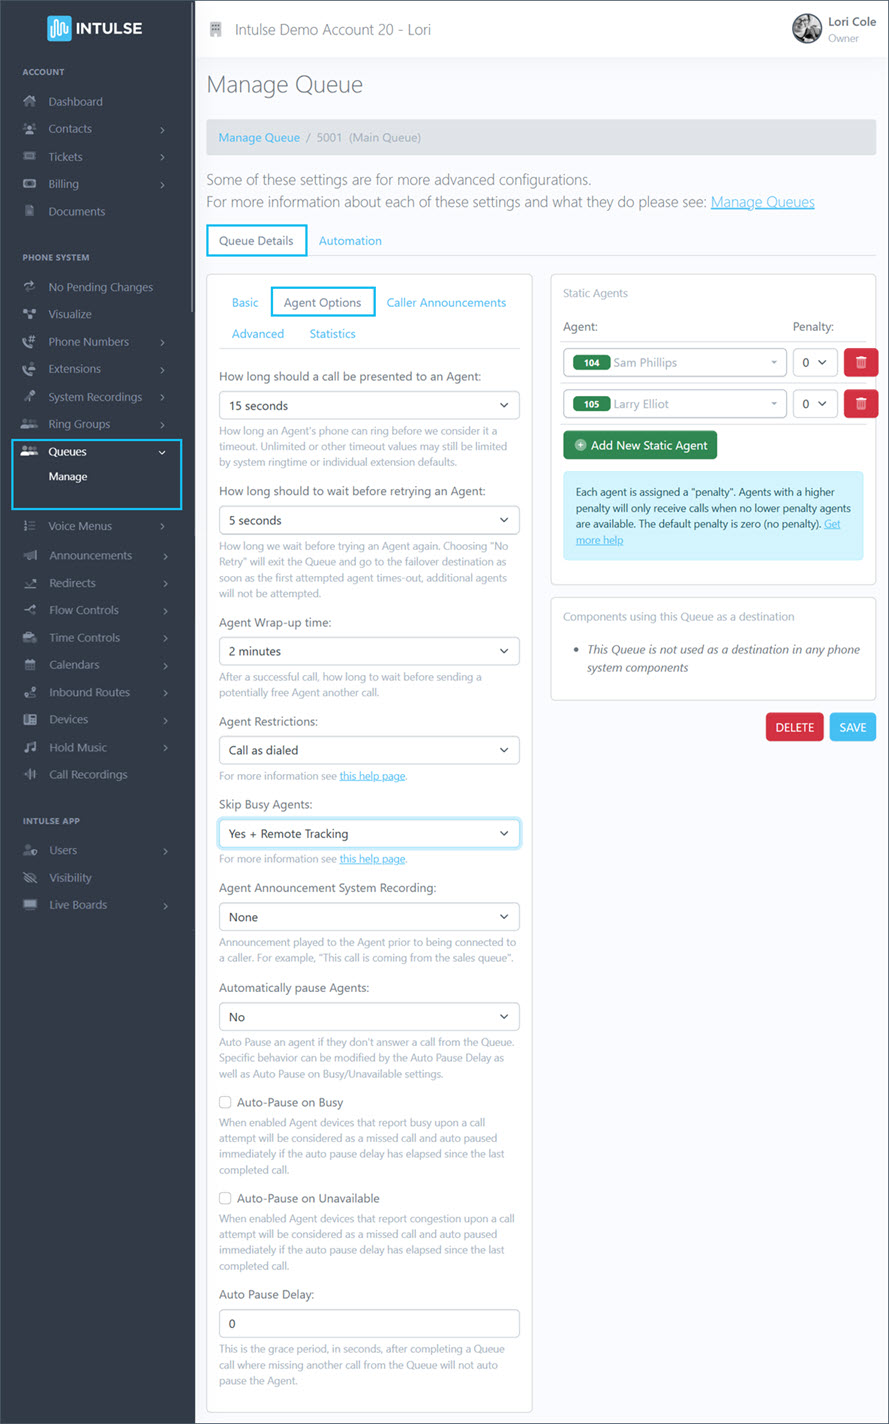
- Determine How long a call should be presented to an Agent. This is how long an agent's phone will ring before the call moves on to another agent.
- Determine How long the system should wait before retrying an Agent who doesn't answer the call. Choosing No Retry will cause the call to exit the Queue and go to the failover destination as soon as the first attempted agent times-out. Additional agents will not be attempted.
- Agent Wrap-up time determines how many seconds to wait after a call has ended, before sending another call to an agent.
- Select Agent Restrictions from the drop-down list.
- Call as Dialed will call an extension, following any Follow-Me or Call Forward settings for that extension.
- No Follow-Me or Call Forward means that the extension will simply ring, ignoring any Follow-Me or Call Forward settings.
- Extensions Only is similar to No Follow-Me or Call Forward, however only extensions will be called. Any external numbers will be ignored.
- Select whether to Skip Busy Agents.
- No means an agent's line will ring even if their phone is occupied.
- Yes means agents who are on an occupied phone will be skipped. This means any phone set to Call Waiting, or multi-line phones will not be presented with the call and in Hunt-style strategies, the next agent will be attempted.
- Yes + Remote Tracking means the queue will track remote agents, including those using Follow-Me. Calls will not be presented to agents who are on another call from any queue.
- Queue Calls Only means the system will only track an agent's queue calls. If they are occupied from other calls, such as outbound calls they initiated, the queue will consider them available and ring them since the device state is not monitored with this option.
- You are also able to select an Agent Announcement System Recording which will be played to the agent prior to being connected to a caller.
- Choose whether Automatically Pausing Agents if they don't answer a call from the Queue. You can choose:
- Yes, in this Queue only
- Yes, in all Queues
- No
- Check this box to Auto Pause on Busy if you want agent devices that report busy to be considered as a missed call and auto pause immediately if the auto pause delay has elapsed since the last completed call.
- Check this box to Auto Pause on Unavailable if you want agent devices that report congestion to be considered as a missed call and auto pause immediately if the auto pause delay has elapsed since the last completed call.
- The Auto Pause Delay is the number of seconds after completing a Queue call where missing another call from the Queue will not auto pause the Agent.
CALLER ANNOUNCEMENTS
There are a few different announcements settings for a queue.
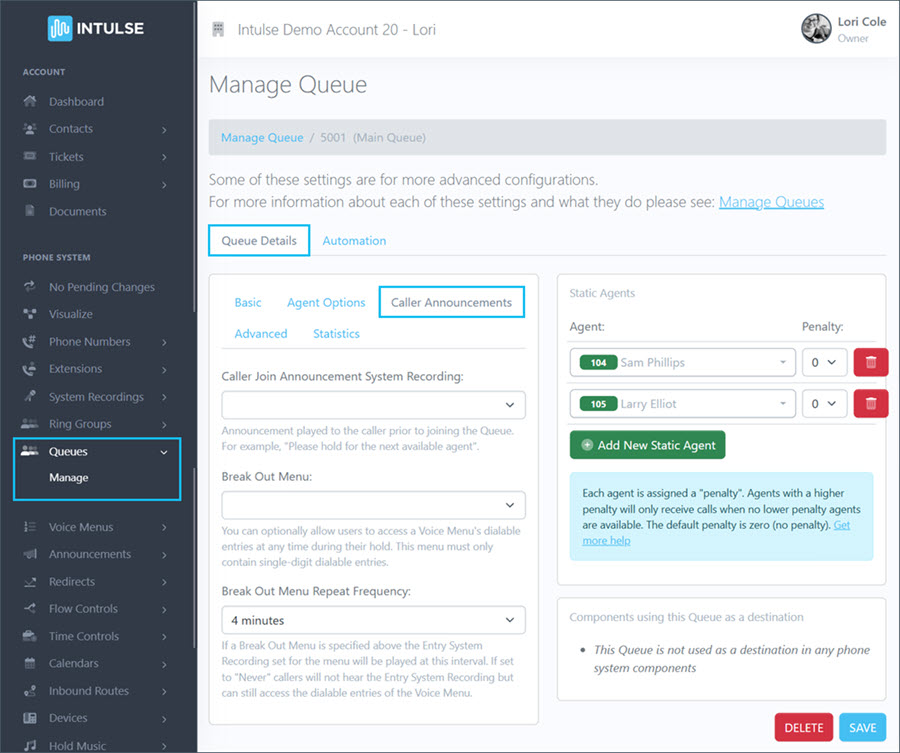
- The Caller Join Announcement System Recording is played to the caller prior to joining the queue. This recording can be created in the Create System Recordings section of the Account Center. Click here for more information about system recordings.
- The Break Out Menudetermine whether a caller can access a Voice Menu's dialable entries at any time during their hold. Click here for more information about setting up a Voice Menu.
- Break Out Menu Repeat Frequency determines how often to play the Entry System Recording for the voice menu to the caller. If set to "Never" callers will not hear the Entry System Recording, but can still access the dialable entries of the Voice Menu.
ADVANCED SETTINGS
There are a few more advanced settings available for your queue.
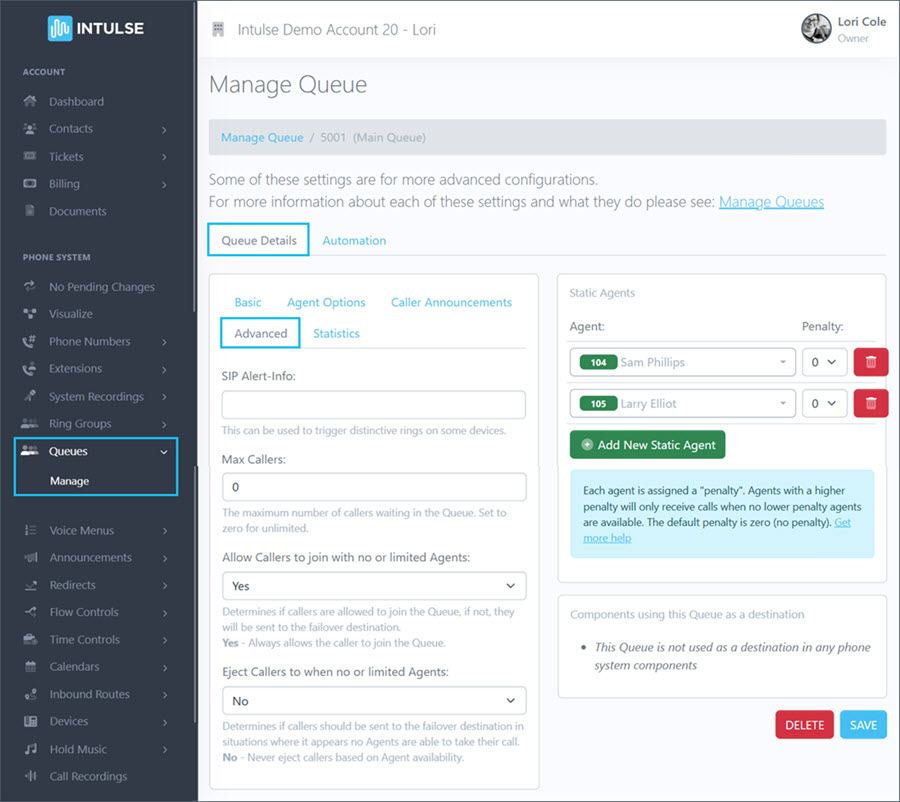
- If you have physical phones and would like them to ring differently for calls coming into this queue, enter brief text for the SIP Alert Info. You will enter the same text in your device settings, which will enable the distinctive ring.
- Set the number of Max Callers waiting in the queue. Set this to zero for unlimited callers.
- There are a few options for whether to Allow Callers to join a queue with no or limited agents.
- Yes always allows a caller to join a queue.
- Strict allows callers to join a queue if agents are logged in, even if all agents are in use or ringing.
- Ultra Strict only allows callers to enter the queue if an agent is available to answer the call immediately.
- No means callers will not be admitted if all agents are paused or show an invalid state, such as not having their phones plugged in.
- Loose admits callers as long as agents are logged in and available to service the queue, even if some agents are paused.
- You also have the following options for when to Eject Callers from the queue.
- Yes means callers will be ejected if all agents are paused or show an invalid state for their device.
- Strict means callers will be ejected if no agents are servicing the queue. If agents are in use or ringing, callers will not be ejected.
- Ultra Strict means callers will be ejected unless an agent is available to answer the call immediately.
- Loose means callers will be ejected if all agents show an invalid state for their device. However, they will remain in the queue if there are paused agents who may become available.
- No means callers will never be ejected based on agent availability. They will only proceed to the failover route once the maximum wait time has expired.
STATISTICS SETTINGS
A variety of data is displayed in the app for each queue, including the number of calls completed, the number of calls lost, the approximate wait time for a caller, the average talk time, and a chart of calls per agent. There are a few settings related to the way statistics are generated for the queue.
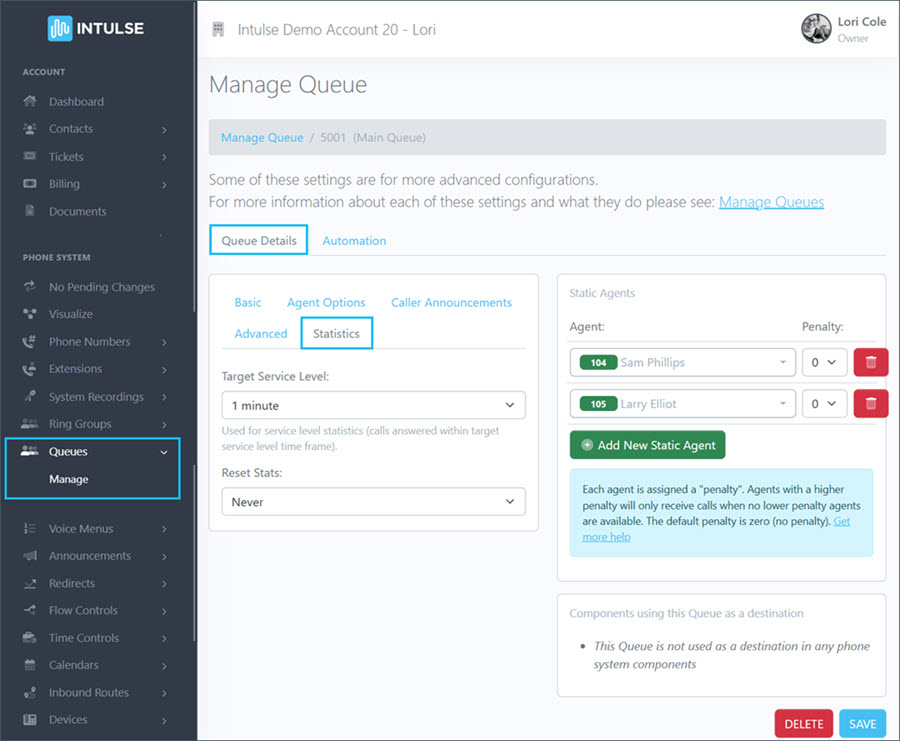
- The Target Service Level sets the targeted time frame within which calls should be answered.
- Select how often you would like to have the Statistics Reset and the time of day when they will reset.
Click HERE to learn more about using Queues in the Intulse App.
Some changes related to your phone system's behavior, such as editing queues, are not live immediately. Rather, the changes are stored and waiting to be applied. This allows you to make ALL of the necessary changes and verify that all pieces of the call flow are in place and functioning together as expected before making them live. Once you've tested your changes and are confident your system is functioning correctly, select "Apply Changes" on the left-hand menu to make your system live. A confirmation popup will open asking if you're certain you wish to apply your changes.


